E10 | Carolina Comeback | Putting Down Roots
Season 47 Episode 10 | 23m 42sVideo has Closed Captions
Jenn goes plant shopping and then helps with landscaping in North Asheville.
Kevin O'Connor travels to Dalton, Georgia, the carpet capital of the world, to watch carpet made from start to finish. In Swannanoa, Zack Dettmore joins a local carpenter to install a butcher block counter, while Jenn Nawada checks in on front-yard landscaping plans in North Asheville. Back inside, Kevin looks at the electrician's seamless under-cabinet lighting.
Problems playing video? | Closed Captioning Feedback
Problems playing video? | Closed Captioning Feedback
Funding for THIS OLD HOUSE is provided by The Home Depot and Renewal By Andersen.
Support provided by:

E10 | Carolina Comeback | Putting Down Roots
Season 47 Episode 10 | 23m 42sVideo has Closed Captions
Kevin O'Connor travels to Dalton, Georgia, the carpet capital of the world, to watch carpet made from start to finish. In Swannanoa, Zack Dettmore joins a local carpenter to install a butcher block counter, while Jenn Nawada checks in on front-yard landscaping plans in North Asheville. Back inside, Kevin looks at the electrician's seamless under-cabinet lighting.
Problems playing video? | Closed Captioning Feedback
How to Watch This Old House
This Old House is available to stream on pbs.org and the free PBS App, available on iPhone, Apple TV, Android TV, Android smartphones, Amazon Fire TV, Amazon Fire Tablet, Roku, Samsung Smart TV, and Vizio.
Keep Exploring

This Old House Insider Newsletter
Get This Old House exclusive stories, tips, and behind-the-scenes information delivered right to your inbox every month.Providing Support for PBS.org
Learn Moreabout PBS online sponsorshipKevin: Today on "This Old House," we are installing under-cabinet L.E.D.
lighting and we're going to learn about good, better, and best.
And from polyester chips to finished carpet all in two days under one roof -- we'll show you the only factory in the world that can do that.
♪♪ Man: Ahh.
That's it.
♪♪ ♪♪ ♪♪ Kevin: Hey there, I'm Kevin O'Connor.
And welcome back to "This Old House" and our projects here in western North Carolina, where we're working on five different houses, and we are just about a week away from getting our homeowners back into their houses.
Jenn is in town over at our North Asheville project helping with the landscaping.
Zack is also here.
He's down in Swannanoa, working in Miah's house alongside Noah, and here at Paula's house, well, you can see there's still some exterior painting to be done, and the interior details are all starting to wrap up.
Hey.
Will, good to see you.
Will: Hey, how you doing?
Kevin: Doing alright.
How are you doing?
Will: Alright.
Great.
Kevin: A lot of progress, huh?
Will: Yes, sir.
Kevin: What is this?
That's a beauty.
Will: So, this is kind of the final touch that we're putting on the house here.
Black walnut entryway.
Kevin: That's very nice.
Will: And then we'll finish it off with this pediment.
Kevin: Oh.
No kidding.
Will: This came from a friend of hers in France, an antique dealer that donated it to the cause.
Kevin: I love it.
Alright.
Well, it's a good thing you're as tall as you are.
That's nice.
So this is a great detail.
And it also is going to straddle a couple other surfaces that Paula has chosen.
She's decided on a solid white oak floor that's going to run throughout the first floor here, and then you can see that we've got a 12x12 ceramic tile, two different colors right here just for the foyer.
Also some stained oak going upstairs, but a whole different surface up there.
And then up here on the second floor in the bedrooms, Paula has decided to put down carpet, which is a pretty typical choice.
Nice and soft underfoot, perfect in bedrooms.
You can see that it's getting installed right now.
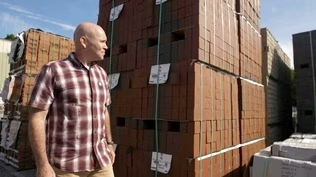
And the other day I actually had a chance to go see how carpet like this is made.
I am in Dalton, Georgia, also known as the carpet capital of the world, and in this enormous facility right here, they manufacture 30 acres of carpet a day, from the polyester pellets to the fiber to the finished carpet.
And it all happens under one roof.
The site manager at this facility, Rob Neal, has promised to give me a tour.
Rob, great to see you.
Rob: Yes, sir.
Good to see you.
Kevin: Boy, this is quite an operation.
It is huge.
Rob: Yes, sir.
2.6 million square feet.
Kevin: Wow.
Under one roof.
Rob: All under one roof.
Kevin: Alright, well, let's start at the beginning.
How do you guys make carpet?
Rob: Alright, so we start with these polyester chips.
This is our resin.
Kevin: Alright.
Rob: These are our color chips.
Kevin: So this is what's in those silos out back?
Rob: Absolutely.
Yes, sir.
Kevin: So when this comes inside, where's it going?
Rob: The resin's going to fall down through this middle hopper here.
Mixing bowl here where they're blended together.
Then it's lowered down into the extruder, all the way out the end where it comes out about 290 degrees.
Kevin: So really hot.
Rob: Really hot.
Kevin: And you're melting them together into one color.
Rob: One color.
Kevin: Pushed out to what?
Rob: Pushed out into some production pipes and then out into the beams where it's separated out into filaments.
Kevin: And I presume that's somewhere over there?
Rob: Yes, sir.
You want to go look at it?
Kevin: Yeah, yeah.
Rob: Alright, here we go.
Okay, so as it's melted, it's like a liquid wax coming through these pipes and down into these beams... through these spinnerets.
Right?
There's your first look at your solution-dyed fiber.
Each one of those is 320 filaments.
Kevin: 320 each?
So almost a thousand individual filaments, like little tiny fishing wire?
Rob: Yes.
Pushed down through those holes.
Then it's going to start the cooling process with air coming out through that filter.
And then as it falls those three stories, it's going to continue to cool.
Once it's cooled, then we can start drawing it, stretching it, and reheating it to give it value.
Kevin: Alright.
Well, let's go down three stories.
Rob: Let's go.
Okay.
So the fiber is now cooled.
Now we're going to start the process of reheating it, drawing it.
And then it's going to run through all these godets and down onto the winder.
Kevin: And then you end up with three of these down below?
Rob: We'll end up with three cones.
It's about -- That's about 15 pounds of yarn.
So three of those about every -- every 14 minutes.
It's going to drop those.
Kevin: And just out of curiosity, do you know how much length you've got on this roll?
Rob: 37 miles of yarn.
Kevin: [ Laughs ] On each one?
Rob: On each cone.
Kevin: And then there's three that you've got right here.
How many of these are you making a day?
Rob: 33,000.
Kevin: Holy mackerel.
And this has all been colored, ready for the next step?
Rob: Ready to go to twisting and heat setting.
Kevin: Unbelievable.
Rob: This is twisting area.
This is where we take the flat yarn, two flat cones, and twist them together.
Kevin: And how many stations are we talking about?
Rob: 22,500 total ends to make a twisted-knot, heat-set cone.
Kevin: So if I'm looking at it correctly, the first flat comes in, goes down.
That's the second flat right there.
And that comes up to the finish twisted right there?
Rob: That's correct.
And the more turns, the more twists you get in this yarn, the more durable it's going to be.
Kevin: How long does it take to get two of these flats into a finished twist?
Rob: So it's going to take about 12 hours to make a 20-pound cone.
24/7, never stops.
Okay.
This is heat setting where we're taking the twisted yarn, running it around, putting it into a stuffer box.
Kevin: Is this the stuffer box?
Rob: That's the stuffer box.
Kevin: And what's it doing in there?
Rob: So, it's two wheels kinking that yarn together, okay?
Kevin: Which I can see right there.
Rob: You can already see it.
Yeah.
You see it taking shape already.
And now it's going to go through the process of setting those qualities.
Kevin: This is the end of the oven?
Rob: This is the end of the oven.
Now we've got to cool it back off.
Right?
You can see that kink in there.
Kevin: Boy, that just looks like a jumbled mess.
Rob: Soft polyester fiber.
Kevin: And then holy mackerel.
What?
Rob: Now the goal is to separate all those fibers and get them back on the cone so that they can be ready for tufting.
Kevin: So even though this is now being pulled tight and it looks like it's sort of back to flat twisted, it's really got a kink in it.
Rob: It's still there.
Kevin: And then is it basically done now?
Rob: It's done.
Kevin: On the cone, off the cone, twisted, kinked, heated.
It's unbelievable, all just to give you the basic raw material to make carpet.
Rob: Soft fiber.
Kevin: And that's next?
Making the carpet?
Rob: That's next.
We're going into 12-foot broadloom, yes, sir.
Kevin: Thought I'd never get there.
Rob: Let's go.
Okay.
This is tufting.
This is where we're taking the finished yarn, reeling 1,500 cones, pulling it through all this tubing and down around across all these rollers, down into the needles.
And then it's tufted into the primary backing.
Kevin: So if there's 1,500 spools, that's each one strand of yarn.
Are there 1,500 needles?
Rob: 1,500 needles going across a 12-foot-wide piece of carpet.
Kevin: So you're tufting that into a backer.
How long is this going to go all the way through?
Rob: We're going to put about 600 feet per roll.
It's going to weigh about 2,000 pounds when it's a finished gray roll is what we call it.
Kevin: So this is it right here?
Rob: This is it right here.
That's 12-foot-wide soft fiber.
Kevin: So is this the finished carpet right here?
Rob: There's still one more step of the process to go to where we're going to put a clean, thin layer of latex on the back of this.
And then we're going to put latex on the face of it, stick it together and dry it.
That's where it's going to get its durability.
That's going to lock in all of these tufts.
Kevin: So if you don't have that backer in there, I can pull these out.
Rob: Yeah.
They pull right out if you don't have that latex to lock it in, to hold those fibers in that, in that backing.
Kevin: Awesome.
And so what do we have here?
Rob: This is a finished piece of carpet.
This is where we're taking the secondary backing and sticking it to the primary backing.
Kevin: This gentleman behind me is doing what?
Rob: He is looking to make sure everything looks good.
As long as he says all's good, it's rolled up, cut, wrapped and sent out the door.
Kevin: And you guys are the only ones doing this all under one roof, where you start with that granular and you come out with wrapped carpet ready to go?
Rob: We are the only ones in the world that do it all under one roof.
Kevin: Well, that is good to know Paula is in great hands.
Rob, I cannot thank you enough.
Rob: Yes, sir.
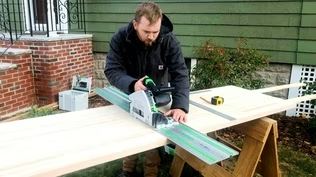
♪♪ ♪♪ Zack: Alright.
What do we have here?
Noah: This is the butcher block for Miah's kitchen island.
Zack: Oh, nice.
Well, what is this?
Cherry?
Ooh!
I like it.
Noah: So pretty.
Zack: It's good.
You're a cherry fan?
Noah: I am.
it's so rich.
And it'll darken, get red.
Zack: Okay.
Is it the right size?
Noah: No.
So, um, we'll go with the width um, as it is, and then we'll just cut it to the, um, the cabinet length plus an inch.
Zack: Alright.
Factory edge is pretty good.
Do you think we could salvage that?
Noah: Yeah.
Let's, uh, check it for square.
Zack: Alright.
Should we, uh, pull an old 3-4-5 triangle here?
Perfect.
Noah: So if I pull four foot and you pull three foot... ...in theory, we should have a five-foot hypotenuse here.
Okay, I'm burning an inch.
Okay, I'll add an inch.
So we got 61.
Perfect.
Right in the center of our 49.
Zack: Alright.
Noah: Okay, so we've got our marks.
We've got our straight edge.
We need to measure how far off of our straight edge our blade is.
Zack: Right.
Noah: So I went ahead and measured an inch and 7/16 from our straight edge will be our 49 inches.
Inch and 7/16.
Zack: Inch and 7/16.
Noah: Alright.
Can we clamp this thing?
Zack: Let's do it.
I like to make a shallow cut first to minimize tearout.
Let me put this.
It helps me to visualize it.
Alright.
So if you look at the blade, its full depth as it's exiting the wood like this, that tooth is wanting to pull up on this top layer of wood, which is sort of our most visible point.
Noah: I'm with you.
Zack: But when it's brought up, you can see as that tooth chews through that layer of wood and it exits, it's exiting at a very gradual level.
So it's very unlikely there's going to be any chipout.
Almost impossible.
And as long as we don't move the blade away from the guide, we should be just fine.
Noah: Okay, well, that worked alright.
Zack: Yeah.
Noah: So reset the blade.
I guess we only need to go deep enough to, uh, make it through the material, right?
Zack: Yeah.
♪♪ ♪♪ It looks great.
A little burning.
We can take care of that with the old sander.
Zack: Alright.
Should we insert the router?
Because then once I go with the router, then I can start hand sanding.
Noah: Sure.
Zack: Now we can use this eighth-inch roundover bit to ease the edges of the butcher block.
And this little bearing will ride on the side of our cut.
♪♪ The top will overhang the cabinets and be supported by steel brackets, which require some extra blocking for support.
These brackets are nice and secure and they're are locked into this 2x4.
And we did a little half-lap joint there.
I got these blocks here.
I guess we'll just use those as shims.
So our countertop can go on top.
Let's screw those down.
Noah: Okay.
So I got our sample block.
The manufacturer wants us to oversize these, uh, pre-drilled holes that our screws and washer are going to go through.
So this is going to be able to travel over the course of the year as the butcher block expands and contracts.
Zack: Yeah, it makes a lot of sense.
I feel like people really underestimate how much wood actually moves.
You can't just screw this thing right down.
Noah: Absolutely.
Zack: Alright, good call.
Let's do this.
♪♪ Alright.
Noah: So we'll do inch and a half off the front since we have the drawers out and then a half inch on each side.
Zack: I think I got to come to you.
Nope, I lied.
Noah: Good, good.
♪♪ ♪♪ Zack: [ Grunts ] Okay.
Looks pretty nice.
Noah: Yeah.
Zack: So what's next for this?
Do you know what you're finishing it with?
Noah: I'm not sure.
I need to talk to Miah and see what she wants to do.
Probably a wax or an oil.
Zack: Yeah, it looks great.
It's nice and sturdy.
Thanks for letting me slow you down today.
Noah: You did great.
I appreciate the help.
Zack: Alright, on to the next one.
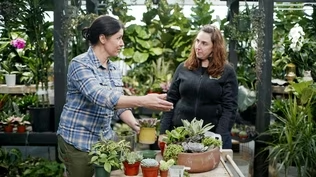
♪♪ Jenn: Wow, Jen, the progress here is amazing.
Jen: Thanks.
Yeah, you saw the boulder wall, but you haven't seen any of the entry plantings yet.
Check out this penstemon.
Jenn: The bearded tongue.
Jen: Yeah.
Jenn: Great.
Jen: It's one of my favorites.
Nice white flowers in the spring.
Jenn: Yeah, it's that pop of color.
Jen: And this one's for you.
Check out my dwarf cryptomeria.
Jenn: Very sweet.
I love the texture.
I love that it's evergreen.
And this is where I left off.
We put these steps in.
What a natural stairway to a beautiful spot.
Jen: It was a lot of work, wasn't it?
Jenn: Yeah.
Jenn: But I think it was worth it.
Jenn: Oh, my gosh.
Jen: Because it can take me up to my beautyberry.
Jenn: It's so beautiful.
Jen: It's amazing.
Right?
But today we're going to plant this boulder wall.
And I want to show you the soil that we're going to use to plant it.
Jenn: Great.
Jen: Okay.
So, Jenn, right here is the soil that I used to plant these entry plantings.
Jenn: Okay.
The existing soil.
Jen: Yeah.
You can see it's a combination of some native soil.
It's very, very clayey.
Jenn: Okay.
Jen: So I have to amend it with this planter's mix for the entry plantings but not for the wall.
Jenn: Yeah, because it doesn't allow for proper drainage.
Jenn: Exactly.
So I'm actually having a soilless soil medium here.
Jenn: Mm-hmm.
Jen: So it's made up of perlite and peat moss.
And then I throw in some coconut fiber substrate and then I mix in some native soil into this mix, and I do it maybe one to one to one.
It just depends on the environment, and it depends on what you're starting with and where you're planting.
But that's going to allow for proper drainage and aeration.
And then I can stick those succulents in the wall.
Jenn: Alright.
Should we go plant them then?
Jen: Let's get started.
Jenn: Alright.
Jen: Yeah.
So I got to get all the soil out of this crevice to make room for my good soil that I'm putting in there.
I'm going to tuck it in there.
And then once I feel I have enough, then I'm going to take my plant, loosen the root system, and I'm going to put it in the crevice and I'm going to get some more soil.
Then I'm going to pack the hole.
I expect the sedum to creep over the boulders and fill in the space between the joints.
Jenn: Alright.
Well, I'm going to do this succulent over here.
This one's called hens and chicks.
And you can see the mama hen and the baby chicks.
So I am going to do the same thing over here and just take a scoop, And I'm going to pack this void in here and then tuck this.
I'm going to add a little more soil so it has something to reach onto.
Kevin: Well, while Jenn is wrapping up some of the details on the outside, we are wrapping up the details on the inside, so it's exciting to see our new flooring go down.
Obviously we've got paint and trim going down, and then as we come up to the kitchen level, new oak on the treads and the flooring right here, probably a nice little breakfast nook right here with access to the deck.
But then, hey, the kitchen is in.
This is awesome.
So we've got our appliances, we've got the cabinets, we've got a quartz countertop right here.
And then we've got the very popular floating shelves.
These are all the rage today.
It's a great look, but of course they are very unforgiving if you're thinking about doing any sort of lighting underneath them.
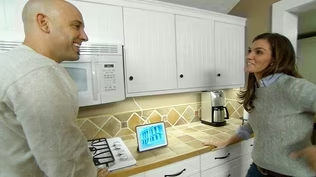
Fortunately, we are back with our electrician.
Mario, good to see you.
Mario: Hey, Kevin, good to see you.
Kevin: So these things are fussy, right?
I mean, when you've got a floating shelf, you don't have any place to hide your light hardly.
Mario: They can be really tricky, but fortunately, we now have this really thin L.E.D.
tape that is low voltage.
Kevin: So we've come a long way.
I mean, little strips of tape is a far cry from the stuff that we used to use.
Mario: We used to have to get some variation of this connected at various points, but as you can see, this doesn't really lend itself to being hidden and giving a good light source.
Also, these were 120 volt.
So what happened was we had to use a line voltage wire.
And so that was very hard to make a connection to hide it and to interconnect them.
Kevin: And something that you're using right now by comparison.
Mario: So now we're using a 24-volt, low-volt cable.
And as you can see, much smaller, much more flexible.
And we're not bound by a stringent of a code as the connection.
Kevin: Okay.
And so in this case, looks like your low voltage coming out of the wall, so it's going down somewhere, and then you've just threaded it through our floating shelf and going to what?
Mario: So the cabinet guys were kind enough to dado out the space for our channel.
And so what we have is a very thin metal channel that we're able to install our tape in, which will then get covered by this lens.
But in order to make this connection, we have to do a little solder.
Kevin: Yeah.
That's good.
In terms of light source though, things have changed as well because these are not all created equal.
Mario: Yes.
Yeah, I've got some options here I can show you.
So our first one, which is the most affordable, is a 1 1/2 watt per foot, but as you can see, a lot of dots.
Kevin: Idividuals.
And even when this is tucked up underneath, that pattern right there, you always see it down on the reflective counter surface and such.
Mario: Correct.
Kevin: Okay.
So dots and low voltage.
Mario: Dots and low voltage, low wattage.
Then we can move up in wattage, which helps for brightness.
Kevin: Oh, yeah.
But you still end up with -- Yeah.
A lot of dots.
All of those.
Looks like they just put more of the diodes in.
Mario: That's correct.
Kevin: Alright.
Mario: So, we like to use this product which is called diode-less.
Kevin: Ooh!
Nice and smooth.
Which means it's going to be even and consistent on whatever it's shining down on.
Mario: Yes.
Kevin: So can we see what's going on underneath with these tapes?
Mario: Sure.
Yeah.
Kevin: So that says it all right there.
Just nice and continuous.
And when it's off, you can't even see the diodes.
So this is what you like working with?
Mario: Absolutely.
Kevin: Okay.
Easy to work with?
Mario: Yeah.
In fact, I have a spool right here I can show you.
So as you can see, it comes off in spools.
Kevin: Mm-hmm.
Mario: It is field-cuttable at every one of these locations.
And then at certain points it's also connectable via these solder pads.
Kevin: Any chance you can demonstrate that for us?
Mario: Sure can.
I have it right here.
Kevin: Look at you.
Mario: Okay.
So we're getting set up here to do what our connection is.
So we've got our third arm tool, which help holds everything in place.
We've got our wire that's coming out of the wall.
We've got our tape with the cut points and the solder point.
We have the polarity marked for us -- positive and negative.
So red and black.
We have our flux, which we will coat the wires with.
We've got our tin, which we will melt on there.
And the last piece is the actual solder iron.
Kevin: Okay.
Mario: So we've applied our flux.
We're going to heat up the pad a little bit.
Kevin: So that's the solder that's on the tape?
Mario: Correct.
We're going to get that flowing a little bit.
So we're going to put our heat right to it.
And then we're going to take our tin and just go ahead and... ...melt that right on there.
Kevin: Nice.
So a little fussy.
But that's a nice clean connection.
And is that connection complete?
Mario: Not quite.
We have one other step, which is we want to wrap it with electrical tape.
Kevin: So the low voltage, I can totally see why you love it.
It's such a low profile, easy to work with.
If we use low voltage though, in a house like this, we've got to transition from line to low, right?
Mario: Correct.
Kevin: How do you like to do that?
Mario: So, we use our L.E.D.
driver.
But in a space like this, it's challenging to put one of these somewhere.
And I don't like putting them in cabinets because if we ever have to service it, people have to move their stuff out of their cabinet.
So we have a crawl space available to us here.
So that's where this transformer is sitting.
But it's still controlled by that wall switch right over there.
Kevin: Alright.
So a nice elegant solution.
I mean, low profile.
And I know Matt and Melinda are going to be thrilled when they see all of this lit up.
Thank you, Mario.
Mario: Thank you.
Kevin: And that puts us one step closer to letting Matt and Melinda get back in this house, which is actually happening next week.
Same for all of our homeowners.
So we've got a homecoming coming your way.
Until then, I'm Kevin O'Connor.
Mario: And I'm Mario Salamone.
Kevin: For "This Old House" here in western North Carolina.
Kevin: Next time on "This Old House"... We've been here for the last 10 episodes, following along as five groups of homeowners have traveled a difficult road to rebuilding.
We've watched them make hard decisions, suffer setbacks, and have to rely on friends and volunteers who showed up to help when it mattered most.
And today, well, today we're going to check in with each of them as they move back into their homes.
That's next time.


- Home and How To

Hit the road in a classic car for a tour through Great Britain with two antiques experts.


Support for PBS provided by:
Funding for THIS OLD HOUSE is provided by The Home Depot and Renewal By Andersen.