E16 | Suburban Victorian | Trim and Proper
Season 47 Episode 16 | 23m 42sVideo has Closed Captions
Tom, Charlie, and Kevin rebuild the back deck with tongue-and-groove_boards.
Charlie Silva visits a Springfield, Mass millwork factory to see custom, paint-ready window trim made from start to finish. Back at the house, he installs the trim and later works with Jenn Nawada to relocate a rhododendron. Tom Silva explains the rain-screen system behind the siding, while Heath Eastman plans and begins the kitchen electrical rough-in.
Problems playing video? | Closed Captioning Feedback
Problems playing video? | Closed Captioning Feedback
Funding for THIS OLD HOUSE is provided by The Home Depot and Renewal By Andersen.
Support provided by:

E16 | Suburban Victorian | Trim and Proper
Season 47 Episode 16 | 23m 42sVideo has Closed Captions
Charlie Silva visits a Springfield, Mass millwork factory to see custom, paint-ready window trim made from start to finish. Back at the house, he installs the trim and later works with Jenn Nawada to relocate a rhododendron. Tom Silva explains the rain-screen system behind the siding, while Heath Eastman plans and begins the kitchen electrical rough-in.
Problems playing video? | Closed Captioning Feedback
How to Watch This Old House
This Old House is available to stream on pbs.org and the free PBS App, available on iPhone, Apple TV, Android TV, Android smartphones, Amazon Fire TV, Amazon Fire Tablet, Roku, Samsung Smart TV, and Vizio.
Keep Exploring


This Old House Insider Newsletter
Get This Old House exclusive stories, tips, and behind-the-scenes information delivered right to your inbox every month.Kevin: Today, on "This Old House"... Charlie: Installing window trim can be tedious, but I have a way that's going to save us a lot of time.
Heath: Then I'll show you how to lay out the electrical for our new kitchen, whether you're doing a renovation or a new build.
Jenn: And by removing just one plant, we've transformed the front yard.
♪♪ Kevin: Ah, that's it.
♪♪ ♪♪ ♪♪ Kevin: Hey, there.
Welcome back to "This Old House."
I'm Kevin O'Connor, and I am currently en route to our project, which is in suburban Needham, Massachusetts.
We are working for a family of five.
They are expanding and renovating their turn-of-the-century home, and first on their list is to open up the first floor.
They want to connect an expanded kitchen to a brand-new family room, and that was made possible thanks to a 1-ton beam that was craned into place, hoisted up, and then bolted right where it needs to go.
Now, the last time we were here, we had all of the rough framing inside complete, the ductwork was going in, and new windows were starting to be installed.
And, today, well, all of the trades are here, including our crew.
Jenn Nawada is going to be working on a landscape plan.
Heath is going to be putting in the rough electric, and, of course, Charlie is here, too.
He's going to be trimming out those new windows.
But before he does that, he's actually got a pit stop that he has to make, which I'll let him explain.
♪♪ Charlie: Installing window trim on an entire house can be time-consuming.
I found us a shortcut that will save us time on this job site.
I'm headed to Springfield, Massachusetts, to a factory that is a one-stop shop.
All the trim is manufactured on site.
Doug Bell, an architectural millwork expert, will show me around.
♪♪ Hey, Doug.
Doug: Welcome, Charlie.
Charlie: So, this is where it all happens.
Doug: This is where it all happens.
Charlie: Did you make all of these parts?
Doug: We do.
We basically are able to turn plastic into all of these architectural elements.
Charlie: Well, that's pretty impressive.
So this is our material here, though.
Doug: This is a rice hull composite consisting of more than 50% rice hulls and PVC.
Charlie: Yeah.
Well, I toured the factory.
Very impressed on how it's made, but now I want to see how you guys put it together.
Doug: All right, let's show you what we can do with it.
Charlie: All right.
Doug: Som this is the heart of our company right here, our CNC router.
Pretty much everything that we do here gets cut on this machine.
Right there is the sheet of rice-hull composite we're gonna be using for your window surrounds.
The router bit that's in there is designed specifically for composites.
So I think we're ready to go.
Charlie: All right, let's see it happen.
So, I see he just puts it in place.
Doug: Now he's turning on the vacuum.
Charlie: And that actually just draws the negative air down to hold the sheet in place, correct?
Doug: Exactly.
Yep.
That sheet will not move.
And here it goes.
So, it's going over to pick up the proper tool.
Charlie: Wow.
Doug: So, you had sent me the quote that you had from your windows.
On that quote, it lists the unit size of every window.
I start out by taking all of that information, I draw it, then turns my drawing into the G-code that's required to run this machine.
Charlie: So, I don't see any dust.
Doug: Well, we trap all this dust in the dust collector, and we save it all.
The manufacturer will send a truck to us, and we load it all up, and they take it back and are able to reuse it into the new material.
Charlie: Wow.
So, I mean, that's a high percentage of being recycled.
Doug: It is.
It's probably very close to 90% or more.
Charlie: That's impressive.
Doug: All right, let's take a look at the finished products.
Charlie: So, it's done.
Doug: What's done is, we've cut these boards out.
So, now, every part, and these are casing legs and heads, are cut to the exact size that are required.
Charlie: As straight as an arrow.
Doug: Yep.
Well, we're gonna take them to the next step in the process of making them window surrounds.
So, now we have all the parts sorted, and we're going to come over to the table saw and cut the bevel on the bottom of the legs.
And here, we are cutting the kerf required for the bulb seal.
It's a silicone bulb seal that basically installs into this kerf just like that.
Charlie: So just a pressure fit.
Doug: Yep.
And then, this runs along the inside of the window frame and compresses up against the outside of the window to create a nice tight fit.
Charlie: So all four sides, including our seal, will have it, also.
Doug: That is correct.
Yep.
Charlie: Great.
Doug: So, here is an example of a finished folded sill.
Charlie: All right.
Doug: And you can tell it's folded because it's gonna have face grain on two adjacent faces, and you can see on the end that it's got a miter.
Charlie: And there's the miter right there, and it's just an ever so small, thin skin left.
And that looks like one solid piece.
Doug: Exactly.
This is what it looks like when it comes out of the molder.
Charlie: Okay.
Doug: This goes in as a square board.
It's got profile knives on both edges.
Charlie: So you have to heat this up, though, to bend it.
Doug: Yep.
So, we have a heat tape underneath this piece of aluminum.
It will heat that edge.
And then, we'll be able to fold it and glue it together.
That's all set.
Boom.
Parks it over here.
Charlie: Well, that was quick.
So, how long does this have to sit?
Doug: Only about a minute.
Charlie: So, it's ready?
Doug: Yeah.
Let's take it out.
There you go.
Charlie: That is nice.
Doug: All right.
So, the next step is installing the nailing fin.
So, we've cut a spline in the backside of the casing.
And then, this is gonna be installed right inside that spline.
And ultimately, that's how you're going to attach your window surrounds.
Charlie: It's a perfect fit.
So, these are the sides and the top.
Doug: Correct, and the bottom, all the way around.
This is where we assemble them.
Charlie: All right.
So I see he glued them, put the two ends together.
Doug: Yep.
That's basically a temporary clamp to hold it together while he's installing the pocket screws.
Now it's time to install the sill.
Charlie: So, same process.
Put a little glue on the bottom.
Doug: Yep.
Charlie: So, what's next?
Doug: Next, we apply the back band.
Charlie: All right.
Doug: We will install these with a little bit of glue and stainless-steel pin nails.
Charlie: Good.
Okay.
Doug: Now we're gonna do some quick sanding before we bring it into the booth to spray it.
Charlie: And you're matching our actual window color.
Doug: Correct.
We took the paint chip that you brought us, and we had it matched.
All right.
So, here we are.
We have five completed already for you.
Charlie: All right.
So, two coats of paint.
Doug: Two coats of paint.
Charlie: Nailing flange on.
Doug: Correct.
Bulb seals installed.
Charlie: Well, this looks great.
You have saved me a ton of time, and I can't thank you enough.
Doug: You are very welcome.
♪♪ ♪♪ ♪♪ Jenn: This massive, overgrown rhododendron takes up a lot of real estate in the front of the house, so the homeowners decided to remove it and make room for new plantings.
Keep going.
Okay, that's good.
Luckily, the backyard needs additional screening, so, today, Charlie and I are going to transplant it to its new home.
Nice scoop.
♪♪ You got it.
Charlie: I'm watching you.
Jenn: Yep.
Just keep on going.
Charlie: What do you got for a measurement, Jenn?
Jenn: I got 6.
Charlie: So, how old do you think this is?
Jenn: I think it's about 75, could be 100 years old.
So, we get it up and in.
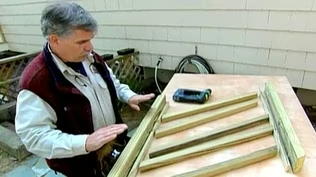
♪♪ ♪♪ Tom: So, all of the work on the exterior house is really coming along great.
We've got our house wrap on for air movement and less moisture so that it doesn't get into the cavity of the house.
And we have these nailer strips right here, this lattice work, to basically create a space behind our trim work right here, so air can travel up into this cavity.
And if any condensation should form or moisture should develop, that air moving all the time will dry it out, so the house won't get rot, mold, or mildew.
But you also want to make sure you can keep the bugs out.
So, we have a bug screen that goes right across the bottom so no bugs can climb in there and nest inside the wall.
So, we got that going, and now we can side the house.
♪♪ [ Saw whirring ] ♪♪ ♪♪ ♪♪ All right.
Charlie and I are getting ready to put some of the new decking on the new deck back here over a flat roof.
But flat roofs really aren't flat.
They have to be pitched so the water can run off somehow.
Underneath our roof, our roofing -- that's a rubber roofing -- there is a pitched piece of material that basically puts a pitch on the roof.
That pitch is about 1 inch every 6 feet.
So, now, we don't want our decking to follow the pitch of the roof.
When we're sitting on a chair, we want to feel level.
So we're going to frame the decking level.
To do that, we put shims on top of the rubber roof, but we tapered them so they're shallow on that end and wider on this end.
So the bottom follows the pitch as it goes up, making the top level and the bottom pitched.
Now, on each end, there's an opening for the water to drip out of.
Now, the first thing we're going to do is, we're actually going to make a picture frame around the perimeter here, and the deck boards will fit in between, so we'll have our corners mitered.
And that's what we're measuring for right now.
[ Saw whirring ] So, we mitered this corner.
It's a 45-degree angle.
And we're going to fasten it from below with pocket screws.
So I put the bracket on... ...drill a hole, and that screw will go through that hole into the other piece, holding them together from below.
Good.
All right.
So, now we have a nice, tight miter that's never going to open up over time.
All right.
So now we're going to screw our board down on the perimeter.
Put it on my mark.
And we're going to fasten it with this screw right here.
It's a two-directional thread.
There's a thread that's right there that's gonna pull the screw into place.
And this thread right here is a left hand.
It's going to push the board down against the framing once it gets in.
And this tip is going to drive the head of the screw below the surface creating a void.
So we can drop our plug.
So I just hold it put it into the hole hit it drops down and it's flat.
[ Drill whirring ] Charlie: Well, now that the board is in place, we might as well get this cleaned up.
Tom: Yeah.
Sounds good to me.
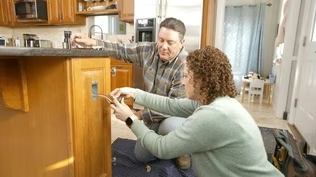
♪♪ Heath: If you're taking on a renovation or a new build, an electrician will definitely be involved.
But if you don't pay attention to the timing and sequencing of the electrical work, you could run into issues with things like inspections or the final fit and finish of your project.
So, please, do it once and do it right.
Now, with that, welcome to the kitchen, or where the kitchen's going to finally end up shortly.
Now, as you can see, we're working on the rough-in phase, and what that means is, we're installing all of the mechanicals and the electrical in the open walls before the board and plaster go up.
So, before I start doing my electrical work, there are a few things I need.
The first one are the kitchen plans, and I don't mean the ones off the architectural drawings.
I want the ones from where you're actually buying the kitchen cabinets.
These are going to be more detailed.
They're going to have my exact dimensions, they're going to have my elevations, and any other specialty items we may have chosen.
Second thing I'm gonna go for, I need the appliance specifications, and this is for two reasons.
One, I need it for my load calculation for the building.
It's very critical that we make sure we size the service appropriately, and changing some of these appliances can really affect that.
The second reason is, a lot of appliances have very specific areas where we have to install the receptacles or the water lines.
So we want to make sure we know exactly where those go.
And finally, I need the electrical plans.
And this is going to show me how many lights we have, where they're going, what type, the switching, and what else the homeowner wants.
So now that I have all this, I can show you where I started.
So, the first thing I like to do is install a piece of strapping that runs the entire length of the kitchen, where the countertop and cabinets are going to go.
And what I do is, I set this at actual finished countertop height, which is typically 36 inches, and that's what we have here.
Now, typical height is 36 inches at the top of the countertop off of the finished floor.
So our finished floor is 3/4 of an inch.
Cabinets and counter are going on top of it, so I've set this at 36 3/4 inches using a laser level around the entire kitchen.
The reason I do this, it helps me with my layout.
I can go ahead and use this to mark where my appliances are going to be.
So you can see where the oven is going to land, we can see that we have a cabinet down in this corner where I can't put anything that goes from the countertop all the way to the ceiling, and you can see the refrigerator and the freezer over here.
The other thing we did is, I don't normally do this, but to help the homeowner, we've marked out the cabinets and the countertop with blue tape so we can see all the jogs and see exactly where everything's going to land.
And we also marked the island the same way.
This makes it a little easier to put your eyes on it and get a feel for exactly what the space is going to be like, and if there are any changes you want to make, now's the time to do it before we close the walls up.
Now, while we're on the island, I want to jump into what we need for receptacle outlets.
National code says we either have to prep for one, or if we do install one, it wants to be a pop-up in the counter.
But here in Massachusetts, we have to install one no matter what, and we can install it on the sides.
So I'm going to let the homeowner choose whether they want to install it on the left or the right-hand side.
When we come back here, we're going to talk about the counter receptacle outlets that have to go in.
And we have a couple of codes we have to follow with that, as well.
So any countertop that's greater than 12 inches has to have one.
Then, when we have a break in the countertop where we have something like an oven or a sink, we can't be more than 2 feet away from that break with a receptacle.
From that point, we don't want to be any more than 4 feet apart.
The reason for this is most appliances have a 2-foot cord, so when you put an appliance on the counter, they want to ensure that you can plug it in no matter where you install it.
They don't want you running an extension cord across the kitchen.
Finally, we're going to work on the appliances, and this is going to show you exactly why we needed those critical kitchen plans and the appliances specifications.
You can see right here this is our oven in this space.
This is exactly where the oven receptacle has to go.
If we didn't have all that information, we probably wouldn't land it in there, and then installing the oven on the final product would be very, very difficult.
So, now that the homeowners approved everything we've done, I can go ahead and grab the boxes and start the layout.
♪♪ And what I like to do is, I line up the actual device screw hole.
I use this as my point of reference 'cause that'll be the same for all devices or whatever boxes there are.
Box size might be different, so if I did top of box, another box might be taller than this one, so I want to make sure I go to that screw hole.
♪♪ Kevin: Hey, Charlie.
Charlie: Hey, Kevin.
Kevin: Here to help.
I know you and Tommy got started on the deck.
Charlie: Yeah, the other day, we put the border on the deck.
Now we're going to use a clip system, which is right here.
Kevin: So, the infill boards are grooved left and right, or, I guess, both sides.
Charlie: That's right.
Kevin: And then, what's the deal?
This is a hidden fastener system?
Charlie: That's right.
The screw will go right down through that right into the sleeper system, holding it nice and snug.
Kevin: One clip per sleeper, and we're off to the races.
Charlie: That's right.
But now we have a gas pipe.
So we had the plumber come by, they ran a pipe in, roofer came by and waterproofed it.
Kevin: So, this is new.
And what are you thinking?
Just a 1- or 2-inch hole in the long board so we can set that over it?
Charlie: Yeah, it'll be a small hole.
There'll be a flange over the hole, but thinking down the road, 10, 20 years, a leak ever develops right here in this part of the roof because of this, I want to put a little access panel.
So the one long board we're going to cut 20 inches to fit right here.
And we'll use the same plug system to fasten that down.
And then, if they ever want to pull it out, they take out the plugs, take out the screws, they have an access.
Kevin: Smart.
Charlie: Yeah.
Kevin: Smart.
Wicked smart.
All right.
Want to set this one?
Charlie: We do.
So, here.
Why don't you, uh, put these in, and I'll eye it.
Kevin: Right about there.
Charlie: Perfect.
[ Drill whirring ] ♪♪ Charlie: I like it.
Kevin: Yep.
♪♪ Charlie: Before we install that 20-inch piece, I'm going to put one more clip here.
So this is where the two boards will join.
And if we don't, the other board that's long won't have a place to hold it down.
♪♪ So, yeah.
So this side is not going to have the clips because as easy as this board went in, we want to be able to take it out, and if we add clips -- one second -- right there... ...we wouldn't be able to take it out.
♪♪ ♪♪ Jenn: Okay.
So we were able to take the rhododendron out.
And, man, that was not an easy task, but we did it.
What do you think?
Patrick: Well, first of all, I'm amazed that you were able to get that rhododendron out in one piece and transplant it into the backyard.
Really happy you were able to save it.
I think it's going to work much better back there.
Jenn: It's a great focal point, and it adds that little bit of screening that's just perfect back there.
Patrick: Yeah, I think it'll work really well back there.
Jenn: All right.
So, upon our discussion, when I was at the nursery, this is what I came back with, 'cause you mentioned you wanted to keep it lower, right?
And have evergreen, some year-round color.
And then, so what I came up with is to anchor the corners on both side.
This is a juniper, and it's called a Manhattan blue juniper.
And I believe Liz wanted Christmas lights?
Patrick: Absolutely.
Jenn: So this will be a fun tree to come out and decorate.
And anchoring this corner will be perfect.
And then, moving over this way, went with a simple row of clean boxwood.
These are Green Mountain boxwood.
They're going to be evergreen, year-round color.
Patrick: So, about how long do you think it will take these boxwoods to get up to the height of our railings on the front porch?
Because the rhododendron had already gone above and beyond that height.
Jenn: So, your PTSD with the rhododendron is going to be no more because they're not gonna get to that height.
Their growth rate is only about 3 to 5 inches a year.
And, really, if you just prune them once a year, you're gonna be fine.
If that.
You know, let them get to the achieved height that you want and then keep them shaped from there.
Patrick: That sounds awesome.
Jenn: Yeah.
So, would you like to help me get a shovel?
And we'll get them in the ground today for you.
Patrick: Sure.
Jenn: All right.
♪♪ Okay.
So, a little 101 on the planting.
Since I want them to all be in a straight line, just go around each of the base of the pot so you kind of have the imprint of it.
Scoot the boxwood out of the way.
Dig the hole as deep as the plant is.
When you get to your desired depth, you take your boxwood... All right.
Sometimes tapping it around each side, it helps to loosen it.
And then, it should loosen right up like that.
And this is the whole root system.
You want to go around with your hands and rough it up.
And then, place it in the hole.
♪♪ And then I'm gonna look down to see if it's in a straight line.
And then you can see if any others need to be tweaked or adjusted.
Then you save yourself digging up something that you already planted.
But I think we're good.
♪♪ Nice.
And so see how the -- the soil to the top of this root ball is pretty equal to this ground, which is...?
Patrick: Yep.
Jenn: Perfect.
There's one more thing I want to put in the ground today.
Since it's fall, I would love to give you some daffodil bulbs for a little pop of color in the spring.
♪♪ Nice job, Patrick.
Well, I guess it's a wrap, so until next time, I'm Jenn Nawada.
Patrick: And I'm Patrick.
Jenn: ...for "This Old House" in Needham, Massachusetts.
♪♪ Kevin: Next time on "This Old House"... Mark: We're making a new patio, brick by brick.
Kevin: Our Needham homeowners are installing brand-new hardwood floors that are being manufactured just 30 miles from the project.
And I've come here to see the process.
Charlie: And upstairs, we're patching old floors with salvage boards, and I'll show you how.
♪♪ Kevin: That's next time.


- Home and How To

Hit the road in a classic car for a tour through Great Britain with two antiques experts.


Support for PBS provided by:
Funding for THIS OLD HOUSE is provided by The Home Depot and Renewal By Andersen.