E21 | Irrigation Add-On, Stripped Holes | Ask This Old House
Season 23 Episode 21 | 23m 42sVideo has Closed Captions
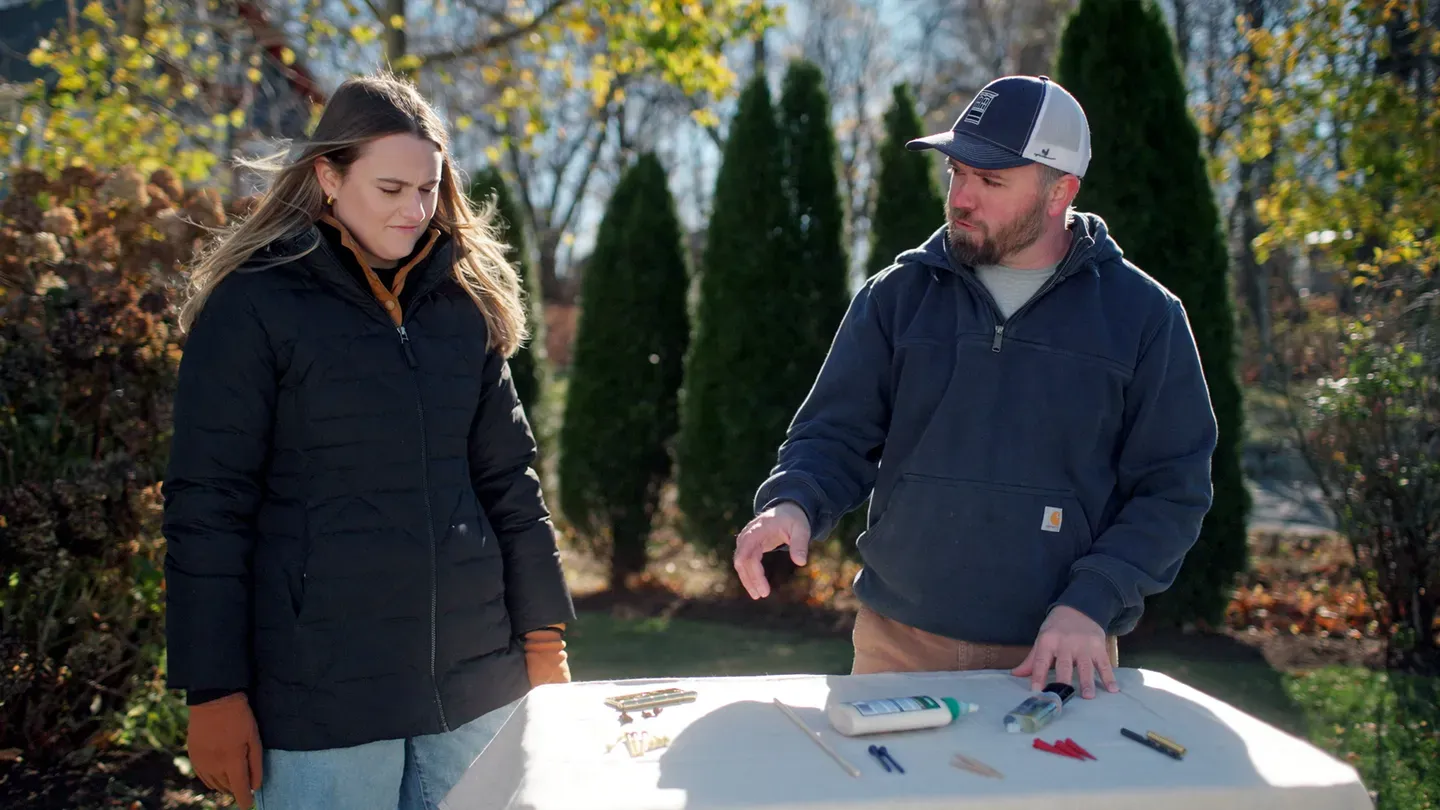
Adding a new zone to an irrigation system; PEX vs. copper; repairing stripped screw holes.
Lee Gilliam travels to Austin, Texas to help a homeowner add drip line to her existing sprinkler spray head system by installing a new zone; Richard Trethewey breaks down the strengths and differences between PEX and copper piping; Nathan Gilbert repairs a door hinge that's fallen out of the old, stripped screw holes by using some wooden dowels, epoxy, and longer screws.
Problems with Closed Captions? Closed Captioning Feedback
Problems with Closed Captions? Closed Captioning Feedback
Funding for THIS OLD HOUSE is provided by The Home Depot and Renewal By Andersen.
Support provided by:

E21 | Irrigation Add-On, Stripped Holes | Ask This Old House
Season 23 Episode 21 | 23m 42sVideo has Closed Captions
Lee Gilliam travels to Austin, Texas to help a homeowner add drip line to her existing sprinkler spray head system by installing a new zone; Richard Trethewey breaks down the strengths and differences between PEX and copper piping; Nathan Gilbert repairs a door hinge that's fallen out of the old, stripped screw holes by using some wooden dowels, epoxy, and longer screws.
Problems with Closed Captions? Closed Captioning Feedback
How to Watch Ask This Old House
Ask This Old House is available to stream on pbs.org and the free PBS App, available on iPhone, Apple TV, Android TV, Android smartphones, Amazon Fire TV, Amazon Fire Tablet, Roku, Samsung Smart TV, and Vizio.
Keep Exploring


This Old House Insider Newsletter
Get This Old House exclusive stories, tips, and behind-the-scenes information delivered right to your inbox every month.Providing Support for PBS.org
Learn Moreabout PBS online sponsorship♪♪ Kevin: On "Ask This Old House," our experts travel across the country to answer questions about your house.
♪♪ Today, Lee heads to Austin to help a homeowner expand their irrigation system.
Then Richard talks pipes -- PEX versus copper.
What do you prefer?
Where are we going?
What does the future hold?
Richard: Depends.
Kevin: And Nathan shows a homeowner how to fix a stripped screw hole.
Nathan: So this is the most common one to become loose first.
There's a lot of different ways to fix it.
Let me show you what I got.
Courtney: Alright, let's do it.
Kevin: Coming up next on "Ask This Old House."
♪♪ Lee: Hi, Kristen.
How are you?
I'm Lee.
Kristen: Hi, Lee.
Kristen.
Lee: Nice to meet you.
Kristen: Nice to meet you.
Lee: Yard's beautiful.
Kristen: Thank you, thank you.
Lee: Really nice.
Kristen: Welcome to Austin.
Lee: Thank you very much.
So we got an e-mail from you saying about some issues with irrigation and some plantings and things like that.
Kristen: I do, I do.
Have you ever been to Texas?
Lee: I've never been to Texas.
First time.
Kristen: Okay, well, it gets real hot here.
Lee: Okay.
Alright.
Kristen: Like over 100 for multiple days.
Lee: That's hot.
Kristen: So I've tried a bunch of different plants.
Lee: Okay.
Kristen: They melt sometimes.
They burn.
And then in the winter, we get some freezing weather, which that doesn't help either.
Lee: Yeah.
Kristen: So I've tried a whole bunch of different plants, and there's one.
It's called a crossvine?
Lee: Okay.
Kristen: That's been pretty hardy.
It survived a couple of years.
Lee: Alright.
Kristen: I'd love to show it to you.
Lee: Let's take a look at it.
Kristen: Okay.
Lee: Alright.
Kristen: It's over here.
Lee: I'll follow you.
Kristen: Thanks.
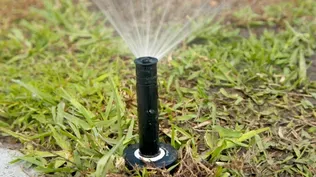
Lee: Right now I see an irrigation spray head here.
Okay?
Kristen: Right.
Yep.
Lee: And then what do we have over here?
Kristen: Okay.
So here she is.
Lee: Okay.
Kristen: This is called a tangerine beauty crossvine.
I like how it grows up.
So I was thinking we can unscrew these and then we could plant all along, and then I could have privacy across the whole back.
Lee: Okay.
Kristen: What do you think?
Lee: I think that's a good idea.
But what do you think about some containers?
Kristen: Okay.
Lee: Some nice -- nice containers that would go really well with your yard and really look nice.
Kristen: I like it, but how would we get water to it?
Lee: We'll put a zone in, okay?
Kristen: Okay.
Lee: And then we'll put a drip irrigation to each container.
I think that's the way to go.
Kristen: Okay.
Alright.
Lee: It's a smart watering.
We'll put it -- You know, it's not spraying off.
It's not evaporating.
But I think that's the way to go.
Kristen: That's helpful in Texas.
Lee: Yes, exactly.
Kristen: Need to save all the water we can.
Lee: It's hot down here.
It's hot.
I need you to show me where your clock is, your control clock for the irrigation.
Kristen: The clo-- Okay.
Yeah.
I think that's in the garage.
Lee: Alright, we'll go take a look at that.
Kristen: Okay.
Here it is.
Lee: Here we go.
So you have your controller, which we call the clock.
Kristen: Okay.
Lee: Let's see what we have in there.
Here they are right here.
Look at that.
We have five zones and we have space to add another zone.
So what we're going to do is put another zone in for the drip that we're going to do for the containers.
Kristen: Is that something that you're going to do?
Lee: No, I'm not licensed in the state.
So I'm going to bring somebody else in who's licensed.
And I think that's the way to go.
Kristen: Okay.
Lee: So I think we're all set.
Kristen: Okay.
Lee: Alright.
Let's go talk to him.
Okay?
I think he's around back.
Kristen: Alright.
Lee: Okay.
So what we got back here?
Hey, Aaron.
How are you doing?
Aaron: Hey, Lee.
Doing well, sir.
Good to see you.
Lee: Thank you.
This is the homeowner Kristen.
Aaron: Nice to meet you.
Lee: So, what do we have?
Aaron: So we found the valve that runs the flowerbed spray zone.
Lee: Okay.
Aaron: Plan is to tie into the main line at some point in this area and add a valve to supply your drip line for your planters.
Lee: Okay, great.
Kristen: What is a main line?
Aaron: So, the main line, if you can think of a main line, we'll use the tree for reference.
Right?
So if you can think of a main line as like a tree, your meter is the base of the tree.
The main line coming off from the irrigation system is the trunk of the tree.
Kristen: Okay.
Aaron: And that's feeding all of the valves a source of water.
Right?
If you can look up in the actual tree line, the branches where those branch off would be a valve location.
And everything past that point would be lateral.
And the leaves and the acorns and things of that nature would be heads and spray nozzles.
Kristen: Okay.
Got it.
Lee: And this is our drip zone?
Aaron: That's correct.
That's the valve we'll be using.
Lee: Okay.
So this is -- what?
-- 40-psi drip kit?
Aaron: That's correct.
Lee: Okay.
So this is like a drip kit.
It drops the pressure of the system that we have.
This drops the pressure for the drip.
Kristen: Okay.
Lee: Okay?
And here's the brains.
This is a solenoid.
Water comes in here.
The clock tells this to go on.
It lifts up and it just -- boom -- waters out.
Kristen: Okay.
And what's the -- Is the pressure the biggest difference from what I have now?
Lee: Correct.
You can explain that.
Aaron: The way that this works is it's got a pressure regulator and a filter that kind of regulates the amount of water towards those drip lines.
Kristen: Okay.
Aaron: Basically, just to keep the system from not having failed fittings and failed bubblers, et cetera.
Right?
So that kind of helps just to protect your system as it's installed.
Kristen: Okay.
And then last thing -- I have water restrictions here, as you know, in Austin.
Aaron: You do.
Yes, ma'am.
Yeah.
Yeah.
So, with restrictions again, they're sticking to one a day currently.
Kristen: Yeah.
Aaron: They change regularly.
So always check with your local -- your local state guidelines there.
But in the sense of drip line, drip lines referred to as a controlled form of irrigation.
So it's going directly into the soils.
So it's not as highly regulated as what you would see with your sprays, rotors, et cetera.
Kristen: Okay.
Aaron: So currently you're able to water whenever you'd like to water it.
Kristen: Oh, nice.
Aaron: So that's the nice thing about drip, why it's superior in my opinion.
Lee: Gets right to the -- right to the source.
So like spray heads and rotary heads, a lot of wasted water, a lot of evaporation, things like that.
So the drip is right -- constant right on the plant.
So it works out really good.
Kristen: Okay.
Aaron: In the state of Texas it's referred to as matched precipitation.
Lee: Okay.
Aaron: We don't want to mix types of irrigation on the same zone because each one of them has different water requirements.
Right?
Lee: Sure.
Aaron: Like a drip zone would need significantly more time to run than a spray zone.
So you have them two together, you can obviously drown an area out, right?
So that's where you got to be very careful, which is why we're going to be adding a whole separate valve, a whole separate zone just for those drip zones.
Lee: Okay.
That's what we need.
Aaron: Correct.
Yeah.
Lee: Alright.
Great.
Aaron: Yeah.
Lee: So I think I'm gonna let you guys get to work.
Aaron: Good do.
Yeah.
We got a lot to do.
Lee: You and I, we got some stuff to do, too.
Kristen: Alright, let's go plant some things.
Lee: Alright, let's go.
Aaron: Absolutely.
Lee: Alright.
We'll see you soon.
Thank you.
♪♪ Okay.
What do you think?
Kristen: I love them.
Lee: Not bad.
I think they're going to go great with your decor in your backyard.
Kristen: I think so too.
Lee: These are really easy to deal with.
Lightweight.
They look concrete.
Kristen: Yeah.
Lee: But they're fiberglass.
Kristen: I love it.
Lee: Okay?
Styrofoam.
Kristen: Great job.
Lee: Alright.
So what I want to do is we'll start putting some soil in here, okay?
Kristen: Okay.
Lee: Potting soil and mixed in with some compost.
But these have some good-sized holes for the drainage.
Okay?
Kristen: Okay.
Lee: So I don't want to make, you know, make a mess when we're doing it.
So what I want to do is do some paper towels for the drainage so it slows it down.
And then also when we're putting the dirt in, it won't just go down and make a mess.
Kristen: Right.
Lee: Okay.
So I want to do is just a potting soil.
Nice, lightweight potting soil, good for drainage.
Has some nitrogen in there and phosphate for the roots and for the plants.
Okay?
[ Bag ripping ] Kristen: Do you need some gloves?
Lee: I'm good.
Kristen: Okay.
How much are you going to put in?
Lee: For now, I'm going to put in halfway and then we'll put the plants in.
Okay?
And then we'll put the material around the plants.
Kristen: Got it.
Lee: Alright?
Good.
See, without that paper towel in there... Kristen: Yeah, it would have all fallen out.
Lee: Yeah.
So I think we're ready for a plant.
Kristen: I like it.
Lee: Okay.
You have the gloves on, so let's compact it down a little bit.
Kristen: Okay.
I'm breaking up all the clumps, too.
Lee: Good idea.
Real good idea.
That looks good.
It's good stuff.
Kristen: Okay.
Plants.
Lee: Okay, we got one?
Kristen: One.
Lee: Okay, let me just take it right out.
Kristen: Do you leave these in?
Lee: Yes.
We're going to leave the bamboo in.
This will help the plant grow up on the fence.
And if we take it off, it might flop over and all that stuff.
So this keeps it up.
Okay?
Kristen: Alright, okay.
Lee: So we... Kristen: Want me to dig a hole?
Lee: Yeah.
Give me a little space in there.
Perfect.
So see what we have?
See the root bump?
Kristen: Mm-hmm.
You have to break that up, right?
Lee: Exactly.
So... And the reason why we're doing this, again, so they go out and find the good soil so they'll become root-bound.
Kristen: Yeah.
Lee: How are we doing?
Perfect.
Let's see what we got.
Looks pretty good.
Kristen: That looks good.
Lee: Okay?
Kristen: Yeah.
Lee: And again, remember, we got to pack that down pretty good to get all that air out of it.
Okay?
Kristen: Why is it important to get the air out?
Lee: Because there'll be an air pocket and the water won't be able to get in there.
You know what I mean?
And the roots will -- won't -- they'll dry out.
Kristen: Okay.
Lee: Okay?
Kristen: Okay.
So I've always wondered, are we supposed to bury this?
Lee: Okay.
Good question.
No, I want to keep it at the same level as it came from the nursery, from the garden center, or out in the fields where they harvest the plants.
Kristen: Okay.
Lee: Alright?
But a lot of places, you have to take a little bit of the soil off on top, you know, just a little bit, like this, to expose some roots.
That's it.
So we got a flare on the plants as well as, you know, your beautiful trees in your yard and stuff like that.
Kristen: Okay.
Lee: So that's a good height.
And I want to stay a little bit below the container.
Just a little bit, you know?
Kristen: Okay.
Lee: If we go over too much, you're going to spill out dirt and all that stuff.
Kristen: Right.
Lee: So we'll keep everything contained in the container.
That's it.
What do you think?
Kristen: I'm excited.
Lee: That's gonna look good.
Kristen: They're beautiful.
Lee: Yeah.
Kristen: Now, why do you put compost on the top?
Lee: Well, you could -- we could have mixed it together.
Kristen: Okay.
Lee: But as long as it's in the container, that's all of it, yeah.
Kristen: Okay.
Lee: Okay?
♪♪ Break up those clumps like you did before.
♪♪ Kristen: Suckers.
Lee: Four suckers.
Kristen: Getting cut.
Lee: It's okay.
They'll mend themselves back.
♪♪ So we're gonna set these on the deck.
But I want to use these spacers.
Okay?
Kristen: For what?
Lee: I want air flow to go underneath.
And then also, you can see if they need to be cleaned underneath there, mold or anything like that.
Kristen: I like it.
♪♪ ♪♪ Aaron: Alright, y'all, so we got everything finished up.
Drips installed, controllers adjusted.
You guys are all set to go.
Awesome.
Lee: Appreciate it.
Aaron: Appreciate it.
Kristen: Awesome.
Thank you so much.
Nice to meet you.
Alright, Lee.
We did it.
Lee: Nice job.
Kristen: I love it.
Lee: Looks good.
And then also -- Kristen: What's that over there?
Lee: Also on the back, we put an extra line in there for in the future if you want to do some more work.
Kristen: Okay.
Lee: Some more drip.
Okay?
Kristen: I love it.
This was such a great idea.
Lee: Worked out good.
Kristen: Thank you.
Lee: Thank you.
It was great meeting you.
Kristen: Alright.
So nice to meet you.
Lee: Take care of yourself.
Kristen: Welcome to Texas.
Lee: Thank you very much.
Kristen: Come back.
Lee: Alright.
I'll be back.
See ya.
Bye-bye.
Kristen: Bye.
♪♪ Kevin: Richard, so, a couple of questions in our inbox, which means a few hundred are probably in yours.
Richard: There's always a few.
Kevin: And that is PEX or copper.
What do you prefer?
Where are we going?
What does the future hold?
Richard: Depends.
No.
Kevin: I can't respond to 100 people "It depends."
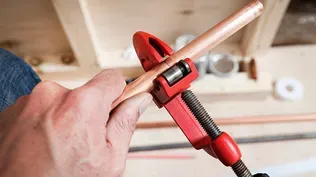
Richard: Look, there's a place for both of these.
You know, copper is a time-proven material.
We've been using it forever.
There's a lot to like about it.
It's rigid and straight.
You know, you run it very logically.
You go this way, and then you go this way, and you go this way through the building with a series of fittings.
Kevin: Yeah.
Richard: It's time-proven, it's corrosion-resistant.
You know, there's no more lead in the solder connection, and it's safe and people know how to do it throughout history.
Kevin: Yes.
Richard: PEX is clearly what is coming along.
Now, PEX has got flexibility.
You can run it like wire.
It's corrosion-resistant, just like copper is.
It doesn't -- It doesn't get brittle over time because it's an engineered product that's cross-linked polyethylene, it's called.
It's not a simple plastic.
Properly manufactured, it's going to last as long as copper and then some.
It comes in coils.
And so now it's a whole different set of skills than the conventional plumber because now you're going to run much like an electrician.
You're going to run tubing up through the building.
You're going to go to that far bathroom and over to the kitchen over here.
And now there's going to be hopefully fewer fittings inside the wall.
Fittings is always the potential leak point.
Copper is going to be more money in both cases, both for the pipe and for the fittings.
You know, if I look at fittings like this versus like this, that the fittings for PEX are probably going to be at least half and the speed to make those connections is going to be less, and there should be fewer connections if you run it like electrician's are going to run his wire.
Kevin: Yeah.
That's interesting.
You like the fact that it's rigid, but that means that every time you want to turn copper 45, 90 degrees, you have to put another fitting on.
Richard: That's right.
Kevin: Whereas the PEX, you can literally run it 100 yards.
Richard: Absolutely.
And you can bend it and fish it up through.
Kevin: So now, I may be old school, but I actually know how to solder.
Richard: Not that well.
Kevin: [ Laughs ] They only leak once in a while.
And those were our secrets.
Richard: Yeah, and you burned that house down.
Kevin: But I actually know how to do this and I don't mind, but when I see PEX, I'm like, "I'm not doing that.
That's for a professional."
Richard: Right.
Well, it always was a pro when it first came out because it was always this proprietary expansion tool.
And so this tool used to be -- what?
-- 600 bucks for a plumber.
And now the same tool is now available manually.
So you see the sleeve.
That's a PEX sleeve that goes on the outside.
And now what we're going to do is expand... expand that tubing and the sleeve.
Kevin: And you've told us that this material has a memory.
Richard: It goes back and it stays on there just as tight as any clamp you could ever put on it.
And it's solderless.
Kevin: And so what is something like -- I mean, this is always prohibitive.
What's something like that cost?
Richard: This ironically costs the same amount of money as this torch kit, and you can reuse it and you never run out of gas.
Kevin: [ Laughs ] But that means that if I'm willing to invest in this for copper, I should have no problem investing in that.
And I can certainly do that.
Richard: Right.
So PEX is going to be clearly -- In most parts of the country, it's become the tubing and material of choice.
There's always going to be a place for copper, particularly in the northern urbanized areas.
And when you're doing remodeling, oftentimes it just makes as much sense to tie onto it.
I like to use copper when I'm around a shower valve like this.
You get a shower valve that you rough into the bathroom.
You know, it's going to have some rigidity so you can secure it to the building.
And then if I'm trying to trim out where, you know, this might be underneath the sink or the toilet.
So you have PEX inside the wall and then you'd be able to trim it out conventionally after you do your trim right there.
Kevin: Mm, okay.
Richard: And then this is an ice maker box.
So you'll see in that same plumbing aisle that now is almost all PEX, you're going to see more and more of these accessories that allow you to use PEX to interface with the -- with the building.
Kevin: So big picture, you are thinking more of this.
Richard: Absolutely.
Kevin: But we're still going to have a time and a place for copper.
Richard: Old habits die hard.
Kevin: Good.
Excellent.
I love that.
Now, that's an answer I can give back to people.
Richard: Depends.
Kevin: That's -- That's already done.
[ Grunting ] Oh, that's not going anywhere.
♪♪ Courtney: Hey, Nathan.
Nathan: Hi, Courtney.
Nice to meet you.
Courtney: Nice to meet you, too.
Nathan: So there's your problem, huh?
Courtney: Yeah.
So the other day, I was taking out the trash, and I couldn't shut the door, and the hinge fell on top of me.
Nathan: Uh-oh.
We don't want that.
Courtney: Nope.
Nathan: Let's take a look at it.
Alright, so first off, a little bit of vocabulary for what we're looking at -- You got this big beautiful wood door.
Nice glass on it.
Going up top, we can see our top hinge here.
We have our leaf.
We have this mortise that was chiseled out of the jamb.
to receive this leaf.
We have our screws.
And as we pull this away, you can see... Yep, stripped-out screw holes, just like you thought.
You think about it, over the years, this door, there's so much weight on it.
And it's opening.
It's closing.
It's always working at that top hinge.
So this is the most common one to become loose first.
There's a lot of different ways to fix it.
Um, I brought some options.
Let me show you what I got.
Courtney: Alright.
Let's do it.
♪♪ Nathan: So as I was saying, there's a lot of options when it comes to fixing out stripped-out screw holes.
I'm going to focus on three.
The first one is kind of obvious.
It's actually just increasing the length of the screw.
So here's a screw that I pulled out.
This one's just a little bit longer.
Go deeper, get a little bit more bite.
In some cases you could even go really long if you need to go back and really grab that jack stud.
But one word of caution if you're going to swap out the screws -- the larger the screw, usually the larger the screw head.
So when we put the screw in, we don't want the head to stick out past the leaf of the hinge, because when the door shuts, those will bind and it's going to change the alignment of the door.
Next option is that we can actually start to repair the hole.
There's a couple of quick fixes.
We could use toothpicks.
You could use golf tees.
You can use a wooden dowel.
You can set it with wood glue.
Or you can use a two-part epoxy which is going to cure faster.
Going down the line, we actually have kits being made now for stripped-out screws.
We have this insert here that you can snap off to the right length, put it in the hole, then put your screw back in.
This one here is really rugged, really cool new option.
It's a brass threaded insert.
So you're going to pre-drill a hole.
You're going to drive it in with a torx bit, flip the hinge back, and put the supplied screw in.
But this is a smaller, newer screw.
So you have older hinges that have larger holes in them.
So this wouldn't really work too well with your older hinge.
Be better for newer stuff.
Courtney: Okay.
So which of the three options do you recommend for my door?
Nathan: I think I'm going to do a combination of the two because the holes that you have are really stripped out.
They've been elongated and we need to start filling that back in.
So I'm going to do a repair.
I'm going to use a wooden dowel with a two-part epoxy.
And then I'm actually going to introduce a longer screw.
But I'm not going to use these ones that have a newer Phillips-style head.
I'm going to go with some older screws that I brought along with me.
Thankfully for you and I, my grandfather used to save a lot of old brass screws, and the reason I want to use these is they have a straight slot or slotted head on them, compared to the modern-day screw that you get, which is mostly going to be a Phillips head.
So I'd like -- Aesthetically I'd like to go back with that straight slot.
Courtney: Perfect.
Nathan: Alright.
Alright.
We're ready for the repair.
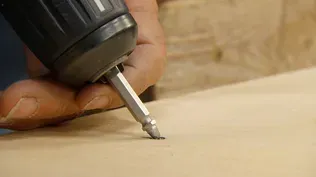
And to get started, I'd like to make these holes all uniform.
So I have a 1/4-inch drill bit chucked in.
And I'm going to drill each hole with this 1/4-inch drill bit.
And I want to keep it square.
And I don't want to go too deep, just enough to get through the jamb.
[ Drill whirring ] Alright.
That's the first one.
Now we have a nice uniform hole we can put that 1/4-inch dowel in.
We'll epoxy that in place.
You want to drill the other three holes?
Courtney: Sure.
Nathan: So the key is we want to keep it nice and square.
We don't want it to go down, up, left or right.
So...
Right about there.
So if you grab that, and there's going to be a little bit of resistance to it.
But go ahead and pull that trigger.
[ Drill whirring ] [ Vacuum whirring ] Now we're going to vacuum out these holes.
And then we're ready for the dowels.
Alright.
So we have our 1/4-inch dowel that are fitting in nicely into there.
Courtney: Mm-hmm.
Nathan: So what we need to do is cut off a few little pieces, probably about an inch long.
I'm gonna cut four of them.
And then I'll mix up some two-part epoxy.
Courtney: Okay.
Nathan: We'll coat the end in the two-part epoxy, and then we will tap them in.
Alright.
Two-part epoxy bonds practically anything.
So we're going to wood to wood, so it's more than enough.
But we could even bond with the metal or with the plastic.
So I'll do the first one.
Then you can do the other ones.
I'm going to put it in, mix it like in there like a Q-Tip.
Alright, you're up.
Alright.
♪♪ ♪♪ Alright.
The epoxy is all cured.
Now it's time to cut those dowels off flush.
♪♪ So now we're just going to do a little bit of sanding just to make sure they're nice and flush with that mortise.
Now we're ready to support this end of the door.
To do that I'm going to use a new construction jack that I have.
Courtney: Okay.
Nathan: I want you to watch that hinge and you tell me when it's perfectly fitting into that mortise.
Courtney: Okay.
Looks good.
Nathan: Looks good?
Courtney: Yeah.
Nathan: Alright.
Now we're ready to use our self-centering drill bit to start a pilot hole for the brass screws that we're going to put in.
♪♪ It looks good, so you can see it's perfectly centered in the hole.
If you tried to freehand that with a drill bit, you run the risk of wandering.
So you might go in, in the center, but then you might hit a piece of grain or something that wants to turn that drill bit a little bit.
Then you go to put your 2-inch-long screw in and you're going to be at an angle.
So this helps keep it nice and straight as well.
So we'll finish up the last hole.
And then we can flip the hinge out of the way and do a bigger drill bit.
♪♪ Alright.
So we have our pilot hole started.
But I want to drill it a little bit deeper.
So what I'm going to do is grab a drill bit that is slightly smaller than the size of my screw.
So only the threads are catching onto the wood.
Bring this in.
[ Drill whirring ] And you can actually feel it go past the jamb into a void which is for the shim space.
And then you start to hit the jack stud.
Which is a good sign that we're going to get into some good meat back there.
Courtney: Okay.
Nathan: So if you want to do the other three, remember, just about a 1/4 inch.
[ Drill whirring ] So we're ready to put our new old screws in.
We're going from a 1-inch screw to a 2-inch screw.
So we pre-drilled for that.
But we're still putting a bigger screw in.
So we're going to need a little bit of resistance as we put it back in.
Um, one trick to overcome that is use a little bit of wax.
So I use this.
I'll get it on the first five, six threads.
And this is going to add a little bit of help against the resistance that we're going to meet as we put it in, preventing us from stripping the straight slot and also breaking the screw.
♪♪ ♪♪ What I'm doing now is I'm taking all the screws and I'm lining up the straight slots, so they're all going the same direction.
♪♪ Alright.
What do you think?
Courtney: Looks good.
Nathan: Want to give it a try?
[ Door closes ] Courtney: Yeah, definitely much better.
Nathan: Easy open, easy close.
Nice and safe.
You can see the door was hanging before.
And you're actually getting some rubbing on your jamb there, so we corrected that.
No more problems.
You are good to go.
Courtney: Awesome.
Thank you so much.
Nathan: You're welcome.
If you've got questions about your house, we'd love to hear from you.
So keep them coming.
Until next time, I'm Nathan Gilbert for "Ask This Old House."
♪♪ Kevin: Next time on "Ask This Old House," Jenn heads to Detroit to learn about the bee population, then creates a garden to attract the local pollinators.
Man: Ooh, it smells so good.
Jenn: I know.
Kevin: Next, Tommy breaks down when to use an impact versus a drill driver, and Mark helps a homeowner whose driveway is in need of a repair.
All that on "Ask This Old House."


Support for PBS provided by:
Funding for THIS OLD HOUSE is provided by The Home Depot and Renewal By Andersen.