E22 | Flower Vase; Smart Garage Opener | Ask This Old House
Season 24 Episode 22 | 23m 42sVideo has Closed Captions
Turning a flower vase on the lathe; upgrading a garage door opener to have smart control.
Tom Silva teaches Zack Dettmore how to turn a flower vase on the lathe. Jenn Nawada explains how to start seeds indoors before spring planting. Mark McCullough breaks down common mortar cracks in fireplace hearths and surrounds. Ross Trethewey upgrades a finicky garage door opener by adding a Wi-Fi hub so that the doors can be controlled and monitored remotely with a smartphone.
Problems playing video? | Closed Captioning Feedback
Problems playing video? | Closed Captioning Feedback
Funding for Ask This Old House is provided by The Home Depot, Renewal By Andersen, and ChipDrop.
Support provided by:


E22 | Flower Vase; Smart Garage Opener | Ask This Old House
Season 24 Episode 22 | 23m 42sVideo has Closed Captions
Tom Silva teaches Zack Dettmore how to turn a flower vase on the lathe. Jenn Nawada explains how to start seeds indoors before spring planting. Mark McCullough breaks down common mortar cracks in fireplace hearths and surrounds. Ross Trethewey upgrades a finicky garage door opener by adding a Wi-Fi hub so that the doors can be controlled and monitored remotely with a smartphone.
Problems playing video? | Closed Captioning Feedback
How to Watch Ask This Old House
Ask This Old House is available to stream on pbs.org and the free PBS App, available on iPhone, Apple TV, Android TV, Android smartphones, Amazon Fire TV, Amazon Fire Tablet, Roku, Samsung Smart TV, LG TV, and Vizio.
Keep Exploring


This Old House Insider Newsletter
Get This Old House exclusive stories, tips, and behind-the-scenes information delivered right to your inbox every month.Providing Support for PBS.org
Learn Moreabout PBS online sponsorship♪♪ Kevin: On "Ask This Old House," our experts travel across the country to answer questions about your house.
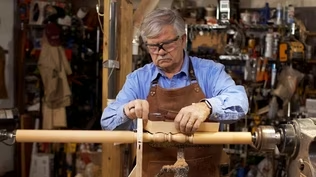
♪♪ Today, Tommy teaches Zack how to turn a flower vase on the lathe.
Zack: This is so much fun.
Kevin: Then Mark answers viewers' questions on masonry cracks, offering advice on how they happen and possible repairs.
And Ross helps a homeowner upgrade the garage-door opener.
Ross: Voilà!
Jimmy: That's unbelievable.
Kevin: All that on "Ask This Old House."
♪♪ Zack: Hey, Tommy.
Tommy: Hey, Zack.
You made it.
Zack: I did.
Thanks for having me up here.
Tommy: Oh, it's my pleasure.
So, what have you been working on?
Zack: I've been doing this new TV show for first-time homebuyers.
Tommy: Yeah.
Zack: It's going pretty well.
Trying to keep them on the straight and narrow so they don't buy a bad house.
Tommy: Well, that could be a definite problem and a very expensive problem to fix.
Zack: Exactly.
Tommy: Unfortunately, a lot of homeowners are waiving the inspections and everything else because they think they have to have that house in the worst way.
There's always another one down the corner.
Zack: That's 100% right.
Trying to instill that wisdom.
But I was thinking about that last house we did in Ridgewood with you, where you turned that doorknob.
Tommy: Oh, the little doorknob with the escutcheon -- covered the escutcheon there.
Zack: Exactly.
That was the perfect gift for those homeowners.
And I thought maybe you could show me how to turn something because I've been doing this 25 years.
I never touched a lathe.
I'd love to... Uh, I'd love to see what it's about.
Tommy: Put your hand on it right there.
Doesn't hurt.
Zack: Alright.
Yeah.
Tommy: Oh, see?
Zack: There we go.
Pulled the Band-Aid off.
Tommy: You're ready now.
The nice thing about a lathe -- Yeah, if you want to give somebody a gift, you know, you can take junk wood.
And, I mean, I'm a Yankee, so I'm cheap, so I will save, you know, scrap pieces of wood and make something out of it.
So these are little gifts.
I like that a lot.
Zack: Little bud vase.
Tommy: And this is another one right here, a little bit bigger.
But I celebrated the bark on this one.
Didn't cut it all off.
Zack: Yeah, I love the way the bark looks.
It's surprising.
I really like that one a lot.
Tommy: Flowers.
You got to make sure you keep watering them.
Zack: I know.
Tommy: Yeah.
Plastic.
Good thing about them.
And, you know, you can turn a piece of wood like this.
Turn it into something -- Zack: Just like that.
Tommy: I might cut it with a bandsaw to make it a little bit smaller, to make it easier.
Um, but there's all kinds of different things out there that you can make and turn and giving a little gift to the homeowners at the end of the project is always nice.
Zack: So how do I start?
Tommy: Why don't you, first of all, put your apron on and then we can get started on the basics and how to do it?
Zack: Alright.
Let me grab an apron.
Tommy: Alright.
So I took a piece of the scrap firewood.
And basically we have a rectangle, not a square.
Zack: Right.
Tommy: Okay.
So to do this, first we want to find a way to mount it into the chuck.
So I've found the rough center, as I said.
I'm gonna use a spur drive right here that will go into this chuck.
Bring it down and tighten it.
Alright.
So I put it on the center mark there.
Put it on the center mark here.
Bring it in.
And now I'm gonna tighten it up and force it in to the teeth.
So now I spin it to see my distance.
So now we're gonna be spinning a lot of air.
So wood, air, wood, air.
We're gonna cut it off.
Zack: Right.
Tommy: Alright.
So turn it on and let it spin.
Got plenty of clearance.
Alright.
So we got to speed it up.
Let's try about 600, 700.
Zack: Sounds like a helicopter landing.
Tommy: Yeah, yeah.
Alright, so now see what difference it makes when you bring it up about 200.
There you go.
Perfect.
Okay, so now that felt a little different, right?
Zack: It did.
Much better.
Tommy: Okay, so now the tool is on the tool rest.
That's open.
That's closing the tool and closing the tool.
So open is where you're at.
But now to keep it from blasting you, you can close it a little bit and angle it this way and go with it.
Zack: This is -- This is so much fun.
Tommy: Yeah.
Yeah.
You're getting the hang of it.
Zack: I like this, I like this a lot.
♪♪ Tommy: Want to put a tenon on this end to put it into this chuck.
♪♪ Zack: Something about it makes me want to, you know, like, pursue that perfectly smooth cylinder.
Just because it feels right, you know?
Tommy: Yeah.
Okay, let's drill a hole for the buds to go into, and then you can do your shape, your taper or whatever you want to that hole.
♪♪ Close the tool and come around with your body at the same time.
♪♪ ♪♪ ♪♪ Okay.
I think you're good.
Let's see.
Oh, look at you.
Nice job.
Nice job.
And you said you couldn't.
Zack: I was -- Tommy: Well, now that it stopped... Now...[ Laughing ] Tommy: No, it looks good.
Looks very good.
Alright, so we'll do a little hand sanding right now.
Blend this in a little bit.
Not sanding off too much.
Sand it.
Circular motion.
Rotate the paper regularly.
Put our sanding paste on.
Probably need a little.
Zack: Just a paste with some mild abrasive in it.
Tommy: It's got abrasive in it.
I'll take a paper towel.
Lightly work it in.
Feel that.
Zack: Glass.
Tommy: Yeah.
Pretty nice.
So now what we'll do is we'll put a finish on that.
So we'll use some oil.
Alright.
So now it's ready to cut it off.
Just don't hit the chuck.
You get in and then come back through a little more.
Little more.
Nice job.
Look at that.
Very little sanding.
That's what I like to see.
Zack: Ooh.
Tommy: A lot of pressure there.
Alright.
There you go.
Nice job on that cut, too, by the way.
Zack: I like it.
Tommy: Very nice.
Zack: This doesn't look exactly like the ones you made, but it looks like the top of a beer bottle.
But I'm pretty proud of it.
Tommy: I think it looks great.
They should all be a little bit different.
Let's top it off with a couple of these expensive flowers.
Make sure you keep water in there so it won't wilt.
Zack: I think our homeowner is gonna be very happy with this.
Tommy: Yeah.
Zack: Well, I appreciate the lesson.
I got to say, it, uh, takes a lot of focus.
I could see this being a good hobby.
Tommy: It's a great stress buster for me because during the day, you have a lot on your mind, a lot going on, nighttime, I go down, turn on my lathe, and you are focused on what you're doing.
And you kind of let the other things fly away.
It's a -- It's a great little tool and a lot of fun and look what you get out of it.
Zack: I know.
It's just too cool.
Thanks so much.
Tommy: My pleasure.
Zack: Alright.
See you later.
♪♪ Kevin: Hey, Jenn.
Jenn: Hey, Kev.
Kevin: Look at you and your rig.
For what?
Indoor growing?
Jenn: Getting ready.
It's time.
Kevin: Very nice.
So, starting from seed.
Jenn: Yep.
You want to know how it works?
Kevin: Sure.
Tell me.
Jenn: Well, first of all, pick your seeds.
Right?
Figure out what you want to grow, whether it's this whole area.
Start with a couple.
Kevin: Yeah.
Jenn: Mm-hmm.
Kevin: A couple different options.
Jenn: Once you pick that, then you go to your trays.
So let me show you the tray first.
Kevin: Please.
Jenn: Alright.
This is where you put seedling mix.
Kevin: Okay.
So individual ones for seed or two in each?
Jenn: Yep.
This holds it up.
It keeps it elevated.
So when this goes back into this tray -- This is the reservoir.
Kevin: Yeah.
Jenn: The draina-- This is helping with drainage.
Kevin: Oh.
So that we don't overwater or so that they're not sitting in water.
Jenn: So they're not sitting in water because you don't want them to sit in water.
Otherwise they'll start to rot.
Kevin: Nice.
Okay.
Jenn: Mm-hmm.
Kevin: And what are we putting in there?
Jenn: So this is the planting medium that you put in.
It's a seed starter mix, right?
So this is filled with organic materials, peat moss, perlite, which is -- So when you're watering it, the water goes pretty much straight through it.
Kevin: Yep.
And specifically you want to look for the stuff for the starting... Jenn: Exactly.
There's a big difference between potting soil and starting.
And then this is a seedling heat mat.
It keeps it warmer.
What we do is -- Yes, take that tray and you set it on.
And it just helps with the germination so the plant doesn't freeze and go into shock.
Kevin: So room temperature may not be warm enough for them.
This is gonna solve that problem.
Jenn: Right.
Yes.
It depends on what your room temperature is.
But it wants to be around 70-ish degrees.
Kevin: Got it.
Okay.
Jenn: Mm-hmm.
Kevin: And then the lights, obviously, if you're doing it indoors, we got to get the proper light.
This is your rig here.
Jenn: Yep.
These are UV lights.
Kevin: Have to have UV.
Jenn: Yep.
Kevin: Do I need something as sophisticated as this because this looks like you're really getting after it.
Jenn: Well, I have to.
Kevin: It's true, I know.
Jenn: No, you definitely don't need -- You know, I got this for the organization.
It tucks nicely into a corner, but you could use something like this light.
It's really easy.
You get online anywhere -- You get any of this online, and then this just hooks to a table.
Kevin: Yep.
And put these over... Jenn: Yeah, and then you can go smaller scale.
You know, you could just line up one of these trays if you want to start small.
Kevin: Okay, so this is the gear.
Um, what about timing?
Like, I can't do this all winter long, right?
And doesn't it matter what I'm trying to grow?
Jenn: Yes.
Okay, so what you do is look back to the previous year's average frost date in your area, right?
Kevin: So the last frost of the season, whatever the average is, that's what I'm... Jenn: That's what you're basing it off of.
Kevin: Okay.
Jenn: Then look at your seed packet on the back.
It says different weeks for different seeds.
So this one says for these 6 to 8 weeks.
Right?
So you go back from the previous year's frost date, say it was April 20th, go back 6 to 8 weeks from there.
And that's when you start.
Kevin: That's when you start.
Jenn: Mm-hmm.
Kevin: Okay.
And I presume it's gonna be different germination times and different lengths of times for different plants?
Some are long, some are short?
Jenn: Correct.
Yep, there's the cold-season crops that come out earlier that are safer to put out, and they thrive in that weather.
And then -- So those are, like, cabbages and broccoli and stuff like that.
Um, and then for example, the second wave would be, like, tomatoes, basil.
They have, like, a more fragile leaf and they don't like the cold as much.
Kevin: Yeah.
This is starting to get complicated.
I've got to really... Jenn: Well, this is where you get your journal.
Kevin: Oh, of course.
Yeah.
Jenn: Right?
Kevin: My seeding journal.
Kevin: Sit with your cigar in the corner with your seeding journal.
Right?
And then you say, "Okay, this is when I planted this at this date.
These are the four things I want to grow in the cold season."
And when those transition out, say you have lettuce or spinach, then those are done.
You take them out and then put the other plants in their place.
It's a whole sequence thing.
Kevin: Ma, the tomatoes are ready.
Put them in the yard.
Jenn: Exactly.
Kevin: Cool.
Alright, gear, methodology, all the stuff we need.
Jenn: Yeah.
And it's fun.
Kevin: Thank you.
Jenn: Yeah.
You're welcome.
♪♪ Kevin: Alright, Mark, you ready for some viewer mail?
Mark: We sure are, Kevin.
Kevin: I'm still calling it mail.
Steve from Little Rock, Arkansas, sends in this problem.
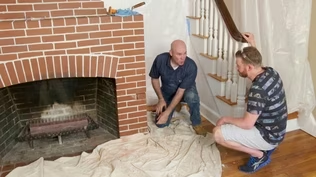
So this is his fireplace.
Raised hearth, as you can see right there.
And that's pulling away from the brick on the wall.
And you can kind of see the cracks.
So your thoughts as to what it is and what should he do?
Mark: Okay, well, very typical problem.
I see it all the time.
That what we're looking at is a raised hearth.
Under that is what we call a subbed hearth.
And it's a monolithic concrete pour that supports the hearth and the firebox.
So that separation is almost typical if it's not done properly, and that's what I suspect.
But it is an easy fix.
Kevin: So you say monolithic pour, meaning that you would have a sub pour that was in behind the fireplace out into the room?
Mark: Exactly.
Kevin: Maybe that didn't happen or maybe that connection broke.
Mark: Right.
Kevin: So what does he do?
Mark: So all he's gonna do is he's gonna take a chisel and a hammer.
This is my favorite chisel.
So that's why I'm gonna use it.
But he wants to take that joint out all the way through.
And he's gonna use a little dab of water just so the masonry doesn't suck the water out of the mortar.
Use a vacuum as well.
And then all you're gonna do is get some Type N mortar and you're gonna get a trowel and a margin trowel, and you're gonna just repack that mortar joint.
One thing I do want to note, Kevin, is make sure that this margin trowel is thinner than the joint.
That way you can get a full pack as you go.
Kevin: So it sounds like something he can do himself.
And we're not really trying to fix the break.
We're just trying to fill in the gap.
Mark: Exactly.
The settlement has happened.
It's probably not gonna continue.
So that's why I say go fix it.
Kevin: Okay.
Next one comes to us from John.
He is in Ohio and he's got a similar situation with the raised hearth, firebox and all of that.
But in this case, that brick wall going all the way up to the ceiling, that has separated from, I guess, the wall behind it right there.
Mark: Right, exactly.
So this problem occurred during installation.
There are a couple steps that he skipped.
Okay?
When I see that vertical joint like that, I can see the mortar pulling away.
The brick is not falling out.
I lined it up with my eye, and you can see that trim on either side of the brick.
That indicates that the fireplace is in place.
If it wasn't, it would fall beyond that trim.
Kevin: So what's causing the separation if it's not pulling away?
Mark: So the separation again really didn't happen.
What happened was when he put the mortar joint in, it shrunk.
The water and the mortar got sucked into this drywall.
Okay?
And it also got sucked into the brick.
So what I would have done during installation is I would have put what we call a bond breaker.
Okay?
So all this is, is a foil.
You strip it in the back, you stick it to the drywall.
That will not allow water to penetrate the drywall.
I would take my paintbrush with a little bit of water.
I would dab the back of the brick.
It does the same thing.
And then I'm using another material.
This is just a Styrofoam material that we called a backer rod.
And if we didn't have that when we packed the mortar in, it would just fall and we'd be there all day.
But other than that, same process of packing, again, make sure you use a thinner margin trowel than the joint itself.
And that way you'll get a full pack.
Kevin: Also something John could do himself, you think?
Mark: Absolutely, Kevin: Beautiful.
Two happy campers right there.
Thank you, Mark.
Mark: Alright, Kevin.
♪♪ Ross: You must be Jimmy.
Jimmy: Yes, sir.
Ross: You wrote about garage doors.
Jimmy: Oh, yes.
Absolutely.
Ross: What's going on?
Jimmy: So the garage doors, they work, but they don't work well.
So when I'm coming home and I'm driving in the car, I have to drive almost all the way up to the door in order for it to work.
Ross: Alright.
So it's a range issue.
Jimmy: Yeah, exactly.
Ross: Will it work from this close?
Jimmy: Since I'm out of the car, probably.
Let's give it a shot.
Ross: Okay.
Let's see.
We got two garage-door openers.
These are the operators.
Half horsepower.
It's chain driven.
Jimmy: Okay.
Ross: Let me take a look at the age on the units.
So the units are manufactured in 1999.
So with 1999, that's close to 30 years old.
So that's obviously an older, uh, you know, garage-door opener, but had a good life so far.
Jimmy: Sure.
Ross: Yeah, that's a good sign.
And that gray wire hanging down is actually the antenna.
So that's what your remote connects to.
We have safety sensors so that we have wires running up to the ceiling and they come down.
They actually come down.
Here's one white wire right here that comes down to this right here.
This is a safety sensor.
Jimmy: Okay.
Ross: It's sending a laser that you can't see across to the other side, that's the receiver.
The whole point is that if something's blocking it, it's not gonna allow the garage door to close.
Jimmy: Okay.
Ross: So a couple of things.
One, I got the green light on, which is good.
It's got power and it's working.
We have, you know, spider webs and some leaves and stuff like that.
So that's definitely one of the things that we'll clean up.
Jimmy: Okay.
Perfect.
Ross: But the one thing I do like about this install is this unit right here has a red learn button.
And that means that these units are upgradable to put it on a SmartHub platform.
So we can install a SmartHub platform.
We can then take control of these devices with an app.
So you can have the left side, right side independently controlled, set schedules, all that good stuff.
You're up for a project like that?
Jimmy: Yeah, absolutely.
That sounds incredible.
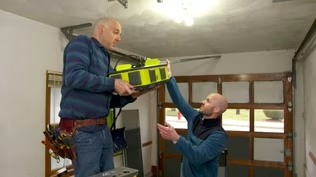
Ross: Okay, so I laid out all the bits and pieces that we're gonna be talking about today.
First, it starts with the SmartHub.
So this is the actual SmartHub that's gonna be mounted to the wall six feet above the ground.
And it's gonna see both garage doors.
Jimmy: Okay.
Ross: So this is really the brain.
Number-one thing here is that we have good Wi-Fi coverage.
Do we have good Wi-Fi here in the garage?
Jimmy: We better.
I worked really hard to make sure that we have a strong Wi-Fi around the house.
Ross: Okay, cool.
Um, then we have power, obviously.
So we're gonna run power to it.
It's a five foot cord, so we got to be within five foot of receptacle for that.
And then once it's ready and we're ready to go with compatibility, we then have a back plate.
We can mount that to the wall with the anchors that are provided and make sure it's good to go.
Jimmy: Okay, perfect.
Makes sense.
Ross: The manufacturer provides a safety card.
So this is basically a label that's gonna stick to the wall to let them know that it is connected to the Internet.
And you can remotely control your garage doors from anywhere.
So even if no one's home, right?
Jimmy: Okay.
Ross: So it's just letting people know that this system is in place and it's connected to the Internet.
Jimmy: That makes a lot of sense.
Ross: Now, when this is in place, it's gonna communicate with Bluetooth to one of the door sensors.
Jimmy: Okay.
Ross: So there's one for the left, one for the right.
These door sensors operate off batteries.
One of the tips here is to take a picture of the back.
So you know which one goes with what door.
You have the model and serial number.
And of course there's a battery replacement.
Jimmy: Okay.
That's easy.
Ross: And so once that's in place, you're gonna have a really good connection between the two doors, the SmartHub itself.
Any last bit is gonna be the wiring.
So some of the safety sensors and some of the tacking up of wires, et cetera.
To clean that up, we're gonna be using this.
It's 24 gauge, two conductor cable, regular, straightforward and great for garage doors.
Jimmy: Oh, perfect.
Ross: Any questions?
Jimmy: Yes.
Does that mean I don't have to use my clicker anymore?
Ross: So your clicker is still gonna work with this system.
So you still get manual operation through the clicker.
You still get it through the wall, you know, keypad, et cetera.
You're still gonna be able to use it through your phone.
So you have the ability to use any of that.
So that doesn't change.
You can still use your garage clicker or you could use the app.
Jimmy: I like options.
Sounds good.
Ross: So there is an app that you need to download.
So I just want to make sure you get that installed and we can get started.
Jimmy: Alright.
Perfect.
Sounds great.
Ross: Cool.
Okay, so the first thing we're gonna do is we're gonna plug in the hub, right, to a receptacle.
And this is a really great location here in the garage because we are on the opposite side of the two doors.
Two doors are right there, which is great.
And so when I plug this in, we're gonna see it illuminate.
If you can take your phone out... Jimmy: Alright.
Ross: ...and pull up the app.
We can see the blue light is on.
Jimmy: Okay.
Ross: Alright.
Jimmy: It would like to pair.
Ross: Pair it.
Yep.
Jimmy: Looks like it's working.
Ross: It's working.
It's changing from blue to green.
That means it's getting connected to your Wi-Fi.
Jimmy: Beautiful.
Ross: And we're gonna get the first door sensor.
Okay.
The light should come on.
[ Beep ] Okay.
Jimmy: That was quick.
Ross: This location right here, I think is a really good location because it can see the SmartHub that's gonna be mounted on that wall, right to this spot.
Jimmy: Perfect.
Ross: Clean the surface.
Jimmy: How about here?
Roos: That looks good right there.
Now, the next thing is to pair the SmartHub with the operator.
Jimmy: Red button.
Ross: Red button.
You got it.
Since you're taller, you could do the honors.
Jimmy: Alright.
Got it.
Ross: Press it.
Okay.
Now hit next.
Jimmy: Holy cow!
Ross: Voilà!
Jimmy: That's unbelievable.
There you go.
Perfect.
Ross: Move to the motor and we hit the learn button on that one.
Jimmy: Alright.
Perfect.
Ross: Same thing as last time.
Alright, let's see if it paired.
There we go.
Jimmy: Alright.
Ross: We're in business.
Jimmy: Love it.
♪♪ Ross: Okay.
We have two different staples.
We have a low-voltage staple that you use a hammer for.
And you have a low-voltage staple that you use a staple gun for.
Both of these are fine for low-voltage cable.
And we're gonna use the staple-gun version because it's gonna make us work a lot faster.
Jimmy: Makes a lot of sense.
♪♪ Ross: So the next bit is to make sure that the sensors are clean.
♪♪ Alright, Jimmy, pull out the app and let's see it in action.
Jimmy: Alright.
Ross: Let's see it work.
Jimmy: Let's give it a go.
Ross: Is he gonna do the left first?
Jimmy: Let's do the left one.
Ross: Alright.
So it's only gonna work one at a time, right?
So left first, obviously.
Jimmy: Alright.
Beautiful.
Ross: One hub communicating with each motor at a time.
Jimmy: Okay.
Ross: Okay.
Left one works great.
Jimmy: Alright, let's try the right one.
Ross: Right one works great, too.
Jimmy: Look at that.
That's incredible.
So will I be able to add anybody else to the app or just me?
Ross: Yeah.
So you can add your wife and anybody else you want to the app.
And you can actually assign privileges in terms of how much access you want them to have.
Let's say a dog walker.
So they have access maybe Mondays and Wednesdays from 9:00 to 11:00.
You can set those time privileges so they have access like that.
Jimmy: So not 24 hours like I would have.
Ross: That's right.
Jimmy: Oh, man, love to hear it.
Well, this is absolutely better than I could have imagined.
Thank you so much.
Ross: Alright, Jimmy.
Jimmy: Appreciate it.
Thanks so much.
Ross: Thank you.
Kevin: Next time on "Ask This Old House," Lee gives some tips on how to properly mow your lawn.
Then do you have questions on how to vet a contractor?
Well, our team offers some insight.
Zack: It's a two-way street, so that contractor is vetting you just the way you're vetting them.
Kevin: And Mark heads to Washington state to help some homeowners replace their front walk.
All that on "Ask this Old House."


Support for PBS provided by:
Funding for Ask This Old House is provided by The Home Depot, Renewal By Andersen, and ChipDrop.