E24 | Overseeding, Foundation Repair | Ask This Old House
Season 23 Episode 24 | 23m 42sVideo has Closed Captions
Common ductwork noises; how to overseed a dead lawn; repairing cracked foundation stucco.
Ross Trethewey explains common nuisance noises that can come from ductwork and offers some solutions; Lee Gilliam helps a homeowner fix her dead lawn by teaching her the processes of aerating and overseeding; Mark McCullough travels to Austin, Texas to repair cracked stucco over concrete foundation. Demonstrating the correct techniques, tools, and materials to use.
Problems playing video? | Closed Captioning Feedback
Problems playing video? | Closed Captioning Feedback
Funding for Ask This Old House is provided by The Home Depot, Renewal By Andersen, and ChipDrop.
Support provided by:


E24 | Overseeding, Foundation Repair | Ask This Old House
Season 23 Episode 24 | 23m 42sVideo has Closed Captions
Ross Trethewey explains common nuisance noises that can come from ductwork and offers some solutions; Lee Gilliam helps a homeowner fix her dead lawn by teaching her the processes of aerating and overseeding; Mark McCullough travels to Austin, Texas to repair cracked stucco over concrete foundation. Demonstrating the correct techniques, tools, and materials to use.
Problems playing video? | Closed Captioning Feedback
How to Watch Ask This Old House
Ask This Old House is available to stream on pbs.org and the free PBS App, available on iPhone, Apple TV, Android TV, Android smartphones, Amazon Fire TV, Amazon Fire Tablet, Roku, Samsung Smart TV, and Vizio.
Keep Exploring


This Old House Insider Newsletter
Get This Old House exclusive stories, tips, and behind-the-scenes information delivered right to your inbox every month.Providing Support for PBS.org
Learn Moreabout PBS online sponsorship♪♪ Kevin: On "Ask This Old House," our experts travel across the country to answer questions about your house.
♪♪ Today, is your ductwork noisy?
Ross tells you why that is and how to fix it.
Then does your lawn have brown spots?
Lee: This is gold.
This is what we want -- compost.
Kevin: Lee shows you how to get your grass green and lush again.
And Mark heads to Austin to help a homeowner repair their foundation.
Mark: Alright.
Nice job.
Kevin: Coming up next on "Ask This Old House."
♪♪ Kevin: Ross, got the boot off.
Ross: Boot is off.
Back to normal.
Kevin: Apparently.
You've been busy.
What have you done?
Ross: Yeah.
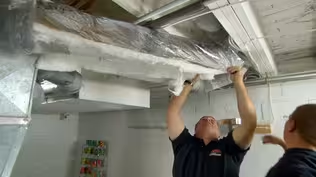
So we're getting a lot of questions about HVAC systems that are too loud, right?
HVAC acoustics is a big deal, and if you have a loud system, it's a problem, right?
Kevin: They hear the rattle.
They hear the whistling.
It drives them crazy.
Ross: That's right.
So when you think about an HVAC system, this is the demo.
This is the prop that where air comes through the return, it goes through the air handler.
So this black thing is the fan.
That would be like your air handler in your furnace, in your system.
Then it comes out through the supply.
It goes through the supply trunk and it goes out to supply registers there.
Kevin: Okay.
And what is it that we're actually hearing that's bothering us?
I'm sure there's a scientific answer.
Ross: Yeah.
So, noise is really vibrations, right?
So when you have things that vibrate, that transfers into sound waves and the sound waves make their way to your human ear, and that's what you hear.
Kevin: Okay.
Vibrations obviously caused by a moving fan.
Ross: The primary candidate in residential systems is the air handler, the furnace fan.
Right?
So that blower wheel that spins and the faster it spins, the more noise it generates.
Kevin: Okay.
Ross: The other one is air velocity.
Air that's moving too fast, it creates that whistling.
It gets that air moving too fast where you're going to hear it through the ducts or through the register when it comes out.
Kevin: So that's creating vibrations as well?
Ross: They both.
Yep.
Kevin: Does your prop work?
Ross: It does.
Kevin: Of course it does.
Ross: Of course.
Kevin: Dad would be proud.
Apparently prop making is genetic.
[ Both laugh ] Ross: So it's a great way to demonstrate.
Here's the return register.
Now I can take a sound pressure level.
Right?
So I can measure the sound coming out of the system.
And this is in decibels.
[ Air blowing ] And I've actually called -- It's dBA.
It's the A-weighted scale.
If I put it up to the unit...
...I'm about 80 dBA.
Alright?
Kevin: And that's because you're close to the motor and that's actually what it's picking up, the sound of that motor?
Ross: The sound traveling by line of sight right on through that return register.
And it's really noisy.
And that's why a lot of systems are ducted.
But guess what.
If I added return ducting to this system like flex duct or a couple of bends, I can dramatically reduce the sound level.
And so I could drop it from 80 down to 70.
And it might not sound like much, going from 80 to 70 on the dBA scale, but that represents twice the loudness.
Kevin: Wow.
Wow!
Ross: So I'll cut it in half by going from 80 to 70.
Kevin: Wow, that is a big difference.
Ross: Huge.
Kevin: And so if I understand it correctly, you're solving a problem by simply just moving the source of the noise, which in this case is the register, further away from the motor?
Ross: Mm-hmm.
Kevin: But is it also the bend that is helping you, and the distance?
Ross: Yeah.
So it's all -- it's moving it further away, proximity.
It's also the line of sight.
The sound travels by line of sight.
So now, by adding that bend in the flex duct, it has more chances to absorb that sound.
Kevin: Clever.
Okay.
But that's fan motor.
Sometimes these things are in the attic, the basement, really far away.
And they're still noisy systems.
Ross: That's right.
Kevin: And that's because the air is cranking, right?
I mean, the air is actually coming out of these pretty fast.
Ross: So when it comes to air velocity, right, so if I measure the air velocity coming out of these, I mean, I could be at 75 decibels, right?
That's really, really loud.
But now a homeowner say, "Oh, I got too much air blowing out," they crank it down.
Now it starts whistling.
Kevin: Because I've choked it down, I've increased the velocity here.
Ross: And now I'm up to 76, 77 decibels.
Kevin: Have I also increased the velocity elsewhere?
Ross: That's right, because it's interrelational.
If I adjust this one, I'm going to get more air coming out of this one, which means more noise coming out of here.
Right?
So we want to make sure we're cognizant of the air velocity coming out of these registers.
Kevin: What are my solutions?
Ross: The simplest thing you can do is adjust the air handler speed.
Sometimes the air handler is just tuned up and jacked up way too much, and so you're moving too much air, too much velocity through that system.
And you got to find that balancing act between reducing that for sound but also not reducing it too much so you have a performance issue.
Kevin: Okay.
And are you suggesting that this is not the right place to sort of choke these down, you know, because it increases the velocity and noise here?
Ross: Yeah.
So choking it there creates that turbulence and that extra air velocity.
If you can adjust it here, that balancing damper back in the wall or back by the the main branch, that allows you to reduce the airflow there and not at the register.
So any turbulence happens further upstream.
Kevin: So that's further away from where our ears are.
Ross: That's right.
Yeah.
Kevin: Very nice.
Ross: And then now what I can do is I can make sure that the flex duct is actually elongated.
You don't want the flex duct to be compressed, right?
When it's compressed, it doesn't do much for you.
Now it's allowing you to muffle that sound and give you that proximity.
Kevin: So same idea as you showed us over there.
And that's going to reduce the DB coming out of this register just by pulling it away and turning it?
Ross: That's right.
Kevin: Wow.
But, Ross -- Ross: 65, 66.
Kevin: When you say a balancing damper inside the system here behind the wall, this is now behind the wall.
That's, to me, got to be done at a good design or you get lucky with a retrofit.
Ross: That's right.
Kevin: If I can't do those, is there anything I can do in the room?
Ross: Yeah.
So first thing, when I walk into a room, a lot of times I'll see wooden registers or really restrictive registers.
And if I compare this 4x10 register, metallic versus wood, this is 50% restrictive.
This is 70% open.
Kevin: Both 4x10.
Ross: Both 4x10.
Kevin: More restrictive.
Ross: Way more restrictive.
Kevin: More noise.
Ross: More chance of whistling, more noise, more velocity.
Kevin: Ooh!
Ross: Right?
4x10.
Kevin: Okay.
Ross: So it could literally be as simple as changing out this register for that register.
It's the same boot.
Kevin: Alright.
Very nice.
Ross: And I could also go slightly larger.
I could go to a 6x10 instead of a 4x10.
I go slightly larger.
Kevin: Bigger register.
Ross: I do have to change the boot, but it's the same duct size.
Kevin: So six inches here to a small boot to a small register.
Same as six inches to a big boot, big register, less noise.
Ross: That's right.
Kevin: Rock on.
Well, this drives a lot of people crazy.
So this is going to be a solution they're going to want to hear.
Thank you, Ross.
Ross: Alright.
♪♪ Lee: Hi, Valerie.
How are you?
I'm Lee.
Valerie: Oh, hi, Lee.
It's nice to meet you.
Lee: Nice to meet you.
So we got an e-mail you sent in.
Valerie: Yep.
Lee: Something about your lawn.
What do you got going on?
Valerie: Yeah, well, it was okay.
But then I started getting brown spots over the summer and just kind of wondering what to do about that.
Lee: I think maybe a couple of things -- The drought that we had this year, so lack of water and the humidity, and looks like we might also have some crabgrass issues.
But overall, you know, the property looks really nice.
The lawn is nice and level.
It looks really good.
But I think the way to solve that issue is I think if we overseed it and that will help for later in the season and then next -- next spring, it'll pick up.
It'll look really great.
But I think what we definitely need to do is, um, aerate the lawn, you know, let it breathe and, uh, and then solve some of the issues with the brown spots.
Valerie: Sounds good to me.
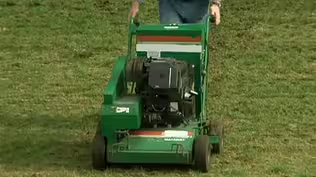
♪♪ Lee: So, Val, this is an aerator.
Core aerator.
Valerie: Oh, okay.
Lee: Okay.
This will, um, put cores in the ground and, uh, seven rows of them, and it gets into that thatch layer.
Alright?
And then you can rent these from box stores, you know, or a rental center.
But these things work really, really well.
Valerie: Oh, alright.
And why do you aerate again?
Lee: I want to aerate to get some nutrients down in there.
Fertilizers, oxygen, and water obviously.
Valerie: So it puts holes in the ground?
Lee: Yes, it does.
Valerie: And then it pulls up -- Lee: It pulls up, pops the cores up.
It almost looks like goose droppings.
Valerie: Oh, alright.
Lee: Okay?
Alright?
So that's one way of looking at it.
Valerie: Okay.
And I can operate this machine?
Lee: Yeah, I'm going to show you how to operate it.
Valerie: Really?
Okay.
Lee: Yeah.
Okay?
Do you have your ear protection?
Valerie: I do have my ear protection.
Lee: Alright.
So we're good to go.
Valerie: Excellent.
[ Motor starts, rumbles ] Lee: So, you have a throttle here.
Give it a little gas.
Valerie: Okay.
Lee: What we're going to do is go all the way down and go all the way around.
Okay?
Valerie: Is it going to go fast?
Lee: Um, we'll just play with it real -- real -- It's like a clutch in a car.
Valerie: Okay, so gentle.
Lee: Okay?
Real gentle.
Valerie: Okay.
Lee: Alright?
So put the bar down that we talked about and be careful.
Go ahead.
Beautiful.
Nice job.
Valerie: Okay.
Lee: Just a little bit.
Valerie: Okay.
Lee: Okay?
Valerie: Here we go.
Lee: Here we go.
Nice.
Real nice.
♪♪ Valerie: What happens to the cores?
Lee: The cores break down and it will help the lawn out even more.
I'd like to aerate at least three times a year.
Early spring is a good time.
Midsummer is a really good time, and the fall.
Okay, Val, so we have some products here now that we want to do after we aerate it.
Valerie: Okay.
Lee: Okay?
Valerie: Seems like a lot of steps.
Lee: It is a lot of steps.
But we're going to combine it together so, you know, single it down.
Valerie: Okay.
Lee: So what we got is we have some grass seed, okay?
I got this here, which is a tall fescue.
Okay?
And then I have over here another one that's like a Kentucky blue.
But the two mixed together will look really nice when it's done.
Valerie: Do they grow at the same rate?
Lee: Yes, they grow at the same rate.
And they'll blend in and it'll be really pleasing to the eye.
Valerie: Oh.
How come you use two different ones?
Lee: Well, if you use one, um, specific one, you can get some diseases and issues like that.
Blending them both back and forth, it helps a lot.
And it's also aesthetic.
Looks really good.
Valerie: Great.
Lee: And then we have our starter fertilizers, okay?
And the numbers on here, and this is the one we want.
We want the phosphate in the middle.
That's for the root growth.
And that helps the seed grow.
Valerie: Oh, okay.
Lee: Okay?
And the nitrogen one, we do that in the springtime, you know.
And that's for color and for growth, quick growth.
But we've got to start off with this.
This is the black magic right here.
This is gold.
So this is what we want -- compost.
Valerie: It's beautiful.
Lee: Yeah, it's really nice stuff.
And that's going to get into the holes that we core-aerated.
Valerie: Okay.
Lee: And so all -- actually all three of these materials will get down inside there.
And then we top it off with this peat moss, this maroon color.
So it's nice and light now.
But when we water, I want it to be a nice dark color.
So that's when we know when we need to water, when it lightens up.
Valerie: Oh, and it's a lighter color?
Okay.
Lee: This incubates the seed and -- as well.
So we're good to go.
Alright?
Valerie: Great.
Lee: Alright.
Let's get going.
We got to throw some -- What are we throwing?
Some compost.
Valerie: Okay, let's get the wheelbarrows.
Lee: Okay.
I'm gonna give you this shovel.
I'll let you do this one.
So what I want you to do is just take the shovel and just go like this.
That's it.
Okay?
Valerie: Oh, okay.
Lee: We're just going to cascade it.
Valerie: And you want kind of even coverage?
Lee: Yes.
We don't want too big for clumps.
If it does get clumpy, we'll rake it out with the rake.
That's all.
Valerie: Oh, okay.
♪♪ Lee: This is going to enrich the soil even more than what it is.
♪♪ Okay.
So we got the fertilizer in now.
Now what we're going to do is spread it out.
You don't want to open this up here because we'll just dump it out.
Valerie: Oh, okay.
So I got to get going first?
Lee: Get going first and then open it up.
Valerie: Okay.
Lee: Exactly.
I set it for like 20 inches to open up.
So that should take care of that, okay?
Valerie: Okay.
Lee: And then like I say, keep a little bit off the driveway.
Keep straight, and you'll see, if you need to come to the right, come to the right.
Valerie: Alright.
Because I don't want fertilizer go-- fertilizing things where I don't want to grow.
Lee: Correct.
We don't want them in the bed.
We don't want them on the driveway.
Things like that, alright?
Valerie: Okay.
Alright.
Lee: Go ahead.
Go ahead.
Go a little faster if you can.
There you go.
That looks great.
♪♪ ♪♪ I'm going to do the perimeter with the bucket.
So I need you to go up and down nice and consistently and take your time.
Okay, Val, we're at the peat moss time now, so I like to just do it with my hands.
So what I'm going to do is break it up a little bit.
Valerie: It seems really light.
Lee: Yes.
Valerie: If it's windy, will it blow it all off?
Do I have to water right away?
Lee: Yes, yes.
Keep it wet.
Valerie: Okay.
Lee: Okay?
That's the trick, is keeping it wet.
Valerie: Okay.
Lee: just a little.
See that?
Valerie: Just light coverage.
Lee: A light coverage, exactly.
♪♪ What do you think, Val?
Valerie: I'm amazed at all the work that we got done.
Lee: Yeah.
You did a nice job.
Real nice job.
Valerie: Looks great.
Lee: But we got it all done.
We aerated, top-dressed it with some compost, fertilizer, and seed, and then we finished it off with the peat moss.
Okay?
Valerie: It looks great.
Yeah.
I can't wait till the grass comes up.
Lee: Yeah.
Give it about 8 to 10 days.
Valerie: Okay.
Lee: I need you to do me a favor -- If you can water it for me every day.
And then if you can -- sneak in there, maybe a noon watering would be great, too.
And you'll see the difference.
You know, the lightness now, but when you water it, it will be that dark maroon color we talked about.
Valerie: Alright.
I will do my best.
Lee: Okay, good.
Nice talking.
Thank you very much.
We'll see you soon.
Valerie: It was great meeting you.
Lee: Bye-bye now.
Valerie: Bye-bye.
♪♪ ♪♪ Adam: Whoo-hoo!
Mark: Adam!
Adam: Hey, Mark.
How's it going?
Welcome to Texas.
Mark: I'm doing great.
Thank you.
How are you doing?
Adam: Good, good.
Mark: Alright, so you wrote us in about a foundation problem?
Adam: Yeah.
The foundation looks a little odd.
I was hoping you might be able to take a look.
Mark: Okay.
So, on my way in, I actually saw the situation I think you're talking about.
But let's go out front and check it out.
Adam: Great.
Mark: Alright.
Alright, Adam, so before we get to the foundation, there's a couple things I want you to notice.
You can see this dirt buildup right here.
Okay?
That's runoff.
So something's carrying that dirt to this position and then throughout your yard.
Another thing I wanted you to notice -- Under this condenser, we have a condenser pad.
The grade on this condenser pad should actually be in this area, not this area.
Okay?
If you look at this valve cover box right here, again, the grade should be closer to the top of this.
I shouldn't have two inches of exposure the way I do.
Adam: Sure.
Mark: And you can see the byproduct of all that is the grade has fallen so much that it's now exposing raw foundation.
And that negates the purpose of the stucco because we're trying to dress up that rough concrete.
So this problem is relatively easy to fix.
But down here... We have a hard, concrete foundation.
You can actually see the form marks in the work.
So this is a wood plank, a wood plank and a wood plank.
We're going to knock these knobs off later when we come back and restucco.
But can you notice this crack right here?
Adam: Yeah.
So is that a structural concern or more just cosmetic?
Mark: So, minor structural concern.
Okay?
When you have softer material above that sitting onto this hard concrete, because of expansion and contraction, they move at different rates.
Thus that corner will want to fall off.
But that's going to be an easy fix for us as well.
Adam: Okay.
So if that's not a crack I should be too worried about, what kind of cracks would I see that would be really concerning?
Mark: Right.
So what I consider a structural crack is if you had a crack, a vertical crack in the foundation, working its way all the way up to the top of the foundation and then transfers into the softer material, like the brick.
That's something we might have to investigate.
Adam: Okay, cool.
So how do we fix it?
Mark: Alright.
Well, we're going to get our tools.
We're going to do some mix and then we're going to do some demo first.
Adam: Sounds great.
Let's do it.
Mark: Alright, Adam.
♪♪ Okay, Adam.
So we're going to be using stucco today, which I consider more of a technique than a product.
But for a stucco mix, I like to start with Portland cement.
Comes in a 90-pound bag, which is pretty heavy.
I use the entire bag.
Then I move over to my lime.
I use four shovelfuls of lime to mix in with my Portland cement, and then, depending on what we're trying to match, I use 20 to 24 shovelfuls of sand.
Now, you can look at this sand and know that it's very fine, right?
But that's the finish that we're trying to match today.
So as you look at your foundation, you can see that's a very fine sand.
Adam: Akay.
Mark: And I think we've done a good job in matching that.
So the effort should be put into matching all materials.
Adam: So what about the stucco mixes I see at the store?
Mark: So, evolution is everywhere.
And that is just part of it, in my business.
They have bags of concrete pre-mixed.
They have bags of type N pre-mixed.
They have bags of type S pre-mixed.
But the stucco is out there.
And again, if you were a mason contractor like me, we're usually working on bigger walls.
But for a homeowner, you have the stuff that you have, which is really small stuff, and it's probably easier to use a pre-mixed bag.
So good question.
Adam: Okay.
So for homeowners, smaller projects probably could do a pre-mixed bag.
Mark: Sure.
Adam: And what do we have here?
Mark: So this is the most important ingredient to me.
This is the bonding agent.
For lack of a better term, call it glue.
But this goes on before we do the stucco, and it's going to help for the stickability.
Adam: Okay.
Mark: Alright.
So we have everything we need.
Time to get to work.
Adam: Let's do it.
Mark: Alright.
Let's go.
First thing we're going to do is peel back some of this grass and dirt.
That's going to allow us to get our trowels a little bit deeper and be able to pull our mortar up and make a full stucco.
Adam: I can see some of the stucco coming off right here as I dig.
Mark: Oh, yeah.
♪♪ Okay, Adam, there are one or two things that didn't happen here.
The most obvious to me is that they didn't use a bonding agent, and the one way we can figure out if they didn't throughout is by what we call tappy tap.
So, the most important tool that we have to do the tappy tap is actually our ears.
So as soon as you hear something hollow, we know we're in trouble.
[ Tapping ] That sound solid?
Adam: Pretty solid.
[ Dull tapping ] Hollow.
Mark: Hollow there.
Okay, so you and I are going to chase this all the way down, and whatever wants to come comes off.
So the first thing I'm going to have you do is rub down this wall.
You can see these pock marks.
Those are left from the forms.
They're actually our friend because they're going to help us bind the stucco coat into this wall.
But before you do that, I do want you to knock down these high spots.
Take this tool.
It's just a rubbing tool.
And just knock those out for me.
And after you do that, you're going to create some dust.
So I'm going to get a hose.
And because we want to soak this foundation down so it doesn't suck water out of our stucco coat, I'm going to spray everything down and eliminate the dust and for better bonding.
Before we apply the bonding agent, we need to start rebuilding the damaged corner.
So we're going to wait for that to set up a little bit more before we address it.
But that's going to give us time to put the bonder on.
So, I always like to start from the bottom and work my way up.
Very, very important stuff.
And if you could actually grab that brush over there, Adam.
Adam: Sure.
Mark: And just kind of brush behind me.
That's why I like to use a sprayer because I can get in any nook and cranny.
While the bonding agent sets, we'll finish repointing the damaged corner.
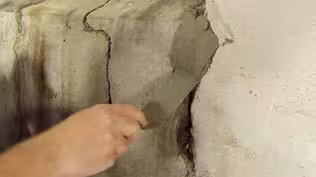
♪♪ Alright, Adam, these are the tools that we're going to use.
They're called steel trowels.
Now, the size of the steel trowels is going to be dictated by our work area.
So we have a small work area.
So our tools are going to be smaller.
This steel trowel can actually grow to about 20 inches or even more sometimes.
Again, if we had a bigger wall to use to do, that's what we'd be using.
The smaller trowel is going to help me do areas like this.
So I'm going to come down with a smaller trowel like this to do that entire joint.
You, on the other hand, are going to take this trowel.
You're going to load up with a brick trowel, spread it around, and then you're going to come from the bottom up and you're going to work this material into this break.
So you're really going to want to stuff it.
And then once you get up here with your trowel, you're going to want to do a little bit of an override.
That override is going to be fluff for us.
And when we sponge, that's just going to give us more ability to sponge and erase this line.
So... Adam: It'll help it blend more then?
Mark: Exactly.
And that's what we're trying to do.
We want to make look like -- make it look like nothing happened.
So why don't you get into that corner and, again, start from the bottom?
Now, if you have to, use two hands.
If you can do it with one, that's great.
Okay.
Good form.
There you go.
Now you're going to leave it just like that and just keep working your way over.
I'm going to take a smaller trowel, which is what we call a margin trowel.
And that's going to dress my trowel.
But I'm going to work down and, again, fluff a little.
Work it up.
Adam: So what are the scratches for?
Mark: So what we're doing right now, again, is what we call the scratch coat.
So we're going to notch all this stucco.
And then it's going to set up a little bit.
And then when we come back with our finish coat, the finish coat is going to bind into these scratch marks and just bond a little bit better.
Adam: So we're making our own nooks and crannies this time around?
Mark: Yes.
Exactly.
And now I'm going to put the finish coat over the scratch coat.
So, the final thing that we're going to do is we're going to use this sponge float.
That's going to help us match the texture that you have existing.
So you take this sponge float and, again, you can see how fine that is.
You're going to use it in a circular motion.
Now, if you don't have a sponge float handy, you can use an average household sponge just like this one.
But you do have to make sure the texture of this sponge, again, is going to help us match existing.
This is going to help me move material around to where it needs to be.
♪♪ ♪♪ So make sure that your last sweep of the sponge is going to be up over that overrun.
And the final step -- replace the dirt we removed in the beginning.
Adam: I got to tell you, Mark, it's a work of art.
Mark: Alright, Adam, we did a lot of hard work today, right?
Adam: Sure did.
Mark: Okay.
Good results.
The only thing I'm going to do is leave you with a little bit of homework.
What I want you to do in about an hour is take a hose, lightly hydrate this wall.
Tomorrow morning, do the same thing.
Tomorrow around lunchtime, do the same thing.
And then tomorrow evening, hit it again.
Again, light water.
And you should be good to go after that.
Adam: Sounds like some pretty easy homework.
Mark: Yep.
Adam: Thank you so much for coming to Austin.
Mark: Okay.
Thanks, Adam.
Talk to you.
Adam: Have a good one.
Mark: You too.
♪♪ Kevin: Next time on a special episode of "Ask This Old House," we look back on our favorite memories of landscaper Roger Cook.
Jenn: He was the god of landscape to this country and he was right there in front of me.
Kevin: We'll celebrate some of his most brilliant moments as a landscaper, we'll share the many ways his teachings changed the landscape industry, and, most importantly, we'll celebrate Roger for who he was and will always be -- our dear friend.


- Home and How To

Hit the road in a classic car for a tour through Great Britain with two antiques experts.


Support for PBS provided by:
Funding for Ask This Old House is provided by The Home Depot, Renewal By Andersen, and ChipDrop.