Cook's Country
Grilled Lamb and Cheesecake
9/9/2023 | 25m 46sVideo has Closed Captions
Grilled Bone-In Leg of Lamb, La Viña-Style Cheesecake; review of spray mops.
Morgan Bolling makes host Bridget Lancaster Grilled Bone-In Leg of Lamb with Charred Scallion Sauce. Equipment expert Adam Ried shares his top picks for spray mops. Toni Tipton-Martin talks about a popular cheesecake that's taking the world by storm, and Bridget makes host Julia Collin Davison a showstopping La Viña-Style Cheesecake.
Problems with Closed Captions? Closed Captioning Feedback
Problems with Closed Captions? Closed Captioning Feedback
Cook's Country is presented by your local public television station.
Distributed nationally by American Public Television
Cook's Country
Grilled Lamb and Cheesecake
9/9/2023 | 25m 46sVideo has Closed Captions
Morgan Bolling makes host Bridget Lancaster Grilled Bone-In Leg of Lamb with Charred Scallion Sauce. Equipment expert Adam Ried shares his top picks for spray mops. Toni Tipton-Martin talks about a popular cheesecake that's taking the world by storm, and Bridget makes host Julia Collin Davison a showstopping La Viña-Style Cheesecake.
Problems with Closed Captions? Closed Captioning Feedback
How to Watch Cook's Country
Cook's Country is available to stream on pbs.org and the free PBS App, available on iPhone, Apple TV, Android TV, Android smartphones, Amazon Fire TV, Amazon Fire Tablet, Roku, Samsung Smart TV, and Vizio.
Providing Support for PBS.org
Learn Moreabout PBS online sponsorship♪♪ -"Cook's Country" is about more than just getting dinner on the table.
We're also fascinated by the people and stories behind the dishes.
We go inside kitchens in every corner of the country to learn how real people cook.
And we look back through time to see how history influences the way we eat today.
We bring that inspiration back to our test kitchen so we can share it with you.
This is "Cook's Country."
♪♪ Today on "Cook's Country," Morgan makes a bone-in leg of lamb on the grill for Bridget.
Adam reviews Spray Mops.
I trace the origins of a world famous cheesecake, and then Bridget and Julia make La Viña style cheesecake.
That's all right here on "Cook's Country."
♪♪ ♪♪ ♪♪ -When it's summertime and you've got a bunch of people coming over to eat, what's going to impress them?
Well, how about a leg of lamb right off the grill?
It's got great flavor, both from the grill and the meat itself, but it does come with a few, hm, let's say, problems.
So Morgan's here.
She's going to show us how to make a masterfully beautiful leg of lamb that everyone will love.
-Yeah, I feel like it's one of my best party tricks, is you carry in this 8-pound leg of lamb, and then you slice it, and you get this rosy interior and people are -- they're hyped.
So -- -That's perfection.
-Now it's even better when it has a really beautiful flavorful crust.
So today I'm going to make that.
-Okay.
-So I have 12 garlic cloves.
We're not shy on garlic.
I feel like lamb can handle some garlic.
Plus it's 8 pounds of meat.
And then I also have 2 tablespoons of kosher salt.
We've got a lot of meat to cover.
-A lot of seasoning.
-Yeah.
2 tablespoons of vegetable oil.
This is really just to bring it into paste territory so it's a little easier to spread on the lamb.
-Okay.
Gotcha.
-I have a tablespoon and a half of black pepper, and then I've got a tablespoon of oregano, so I've got some nice herb action going on in here, too.
-And that's dried.
-This is dried oregano.
And then a tablespoon of fresh thyme.
And this I really wanted that fresh pop.
And then 2 teaspoons of lemon zest and a teaspoon of coriander.
So I'm just going to mix this up.
This is a very approachable flavor profile for lamb.
I wanted this to be something that people who aren't lamb lovers can be converted by.
Okay, so this is an 8 pound bone-in leg of lamb.
I'm using domestic lamb here because it has a slightly more mild flavor.
-Right.
-But I do want to trim a good amount of this fat, so the lamb fat has a lot of that funky lamb flavor.
-That's where a lot of that "gaminess" is.
-Yeah, exactly, but actually also here, I'm doing that because on the grill, it can cause flare ups.
So when I trim meat like this, I go in with my knife horizontally and I try to just get under that but not actually lose any meat.
And then I lift it up like this.
I lift up this side and then again, do sort of -- you're supposed to do some nice thick motions, not a ton of sawing, to get it off.
So just go under, keep your knife horizontal.
-That looks fantastic.
-So flavorful paste, lamb.
-Yes.
-Time for them to meet.
So I'm just going to rub this in here.
Give it a nice little massage.
This is going to do two things.
So actually on the grill, it's going to caramelize a little bit, give me a little extra char, give me some of that nice, impressive color and flavor.
And I'm going to let the salt sit on here for 12 to 24 hours.
And that's going to make the meat extra juicy.
Okay, Bridget, it's my favorite part of the day.
Time to grill.
-Time to grill.
Let's get our grill on.
-Let me show you what I have going on here.
I lit a chimney with six quarts of charcoal, and I poured it over half the grill.
I've got a hot side and a cold side, which is -- -Very hot side.
-Very hot side.
And let me clean and oil this.
I always find it so much easier to do when it's hot.
You can get it so much cleaner.
And then this helps food from sticking.
So I'm going to make you a charred scallion sauce.
-Mm!
-I know.
-That sounds really good.
-So I'm just going to take these 12 scallions and stick them over the hot side of the grill.
-Okay.
-So right now, the grill is like piping hot, which is great for charring these.
And I just want a nice little bit of char, so I'm just going to let these go 3 minutes a side.
-How they looking?
-I think they're looking nice.
I think they're -- We've got some good char.
-All right.
-And these all are going to get chopped up, so it's okay if you have some that are a little more charred and some that are a little lighter.
-Okay.
-Here we go, so -- -Fantastic.
-Half our cooking is done.
[ Both laugh ] Now we just have this.
-That's all.
-Just this.
You do want to put it parallel to the fire.
-All right.
-So I'm going to put it on over here and put it on the cool side.
And then I'm also putting it fat side up.
So this is really important for two reasons.
So first off, lamb has a ton of fat, so you can get a ton of flare ups.
This actually helps render out some of the fat.
You don't have to deal with all those flare ups.
-Right.
-The second thing, this is a really tough cut of meat, actually.
We're going to treat it nice and gently so it'll get really tender.
But cooking it low and slow really helps do that, as well.
-Allows more time for the collagen to start to break down.
-Exactly.
-And become more like silky meat.
-Yes, exactly.
I'm going to cook this covered.
It's going to take about an hour and a half.
I'm looking for it to get to about 120 degrees in the thickest part, which will be about a half inch from the bone.
So I've got the vent open here.
I have the bottom vents open, as well.
-Okay.
It smells like heaven.
-An hour and a half of heaven has passed.
And now here we go.
-Look at that!
-So now I'm going to take a temp.
I'm looking for 120 degrees.
So let's see.
I pull in, and then I pull it back about a half inch.
So I'm looking for a temp.
We're right at 122.
Close enough.
120 degrees is pretty rare for a leg of lamb.
-Sure.
-Leg of lamb, you actually do want to cook it a little bit more to a medium because you do want to actually like -- it's a tough cut.
If you do it to rare, it's going to be a little chewy when we eat it.
-Really chewy.
-We're going to flip it over to the hot side.
-Gotcha.
-And do a nice little flip action.
-Oh, look at that.
-And I'm going to let this go until it's nice and charred.
Those coals have died down a good amount.
-It's been 90 minutes.
-It's been 90 minutes.
They're much more gentle.
A lot of the fat's already rendered out.
So I'm gonna let this go about five minutes.
I'm really just going to go for color here.
-Okay.
-It's going to get up to a nice medium during that, but I don't need to temp it again.
-Oh, my gosh.
Please tell me it's done.
-It is done.
Well, mostly.
-[ Gasps ] -Yeah, you can see some really beautiful color.
It's stunning.
Okay, so this is a big piece of meat, so it does need to rest a little while.
We have to let it rest 30 minutes.
So I'm going to tent it with some foil.
And while is rests, we can go in and we can make our scallion sauce, get ourselves ready.
-And then we eat.
-And then we eat.
So our beautiful lamb is almost done resting.
-I will stand guard.
-Thank you.
Thank you.
And I promised you an equally delicious sauce.
-I'm very excited about this.
-Yes.
So it's pretty simple.
We have those scallions, and I'm going to cut these into half inch pieces, and you can see they're a little dry.
That's totally fine.
Once you add them to the oil, they're going to get nice and soft.
I have three quarters of a cup of olive oil, a quarter of a cup of parsley, a tablespoon of red wine vinegar for a little acidity, 2 garlic cloves, teaspoon of pepper, three quarters of a teaspoon of kosher salt.
You can use table salt for both of these, but you'd want to use half as much.
I have a quarter teaspoon of pepper flakes.
And voilà.
Fancy sauce for you.
-Very fancy.
Very elegant and easy.
-I will say, carving a leg of lamb is one of the pieces of this that takes a little, a little practice.
So first things first, you want to look at the makeup of it.
So you've got this bone running here, and it sort of turns here, and it runs this way.
So you just want to be aware of that when you're carving.
-Right.
-Now, I also hold my knife at an angle, and I carve it, and I try to get these nice thin slices.
-Look at that.
-I know.
So juicy.
-Oh, my gosh.
Oh, my goodness.
-Okay.
-It's getting better and better and better.
-Mm-hmm.
-It really does feed a whole bunch of different preferences, too, because you do have a little bit more well-done meat and then you get closer to the medium rare.
Oh, I love it.
That crust from the lamb is getting on all the pieces.
-Let's get you some more.
And of course, it wouldn't be complete without our charred scallion sauce.
-Mm, mm, mm.
-Okay, let's just give you a nice little drizzle here.
Isn't it so pretty with the red and the green?
Like, even before I dig in, I'm real excited.
-Oh, my goodness.
Mm!
Get a little bit of crunch there from the crust.
-Mm-hmm.
-And that sauce, the charred scallions, it softens their flavor and it gives them a little bit of a sweetness.
-No, exactly.
It's got like a nice little kiss from the grill.
It's got that garlic, that thyme, but it's not overpowering.
Like, you get lamb, and then this delicious sauce.
-I love every single thing about this.
-Well, thank you.
-Thanks so much.
-Thank you so much.
-Well, you've got to make this lamb.
Start with a garlic spice rub and refrigerate overnight.
Grill on the cooler side before browning the meat directly over the fire.
And then grill scallions to make a bold herbal sauce.
So from "Cook's Country," a fabulous grilled bone-in leg of lamb with charred scallion sauce.
Mm, mm, mm.
-Do you want any more sauce?
Top you off?
-Yeah.
A little bit more, please.
-Yeah.
Let's top you off over here.
♪♪ -I'm a little bit of a stickler when it comes to having clean floors, especially in the kitchen.
And I much prefer the spray style mop over the traditional mop that requires buckets of water and wringing out.
I actually broke my spray mop the other day, and so I'm excited to hear what you have to say because these weren't on the market when I bought my first spray mop.
-Perfect timing for the testing.
And you're so right.
These are a lot more convenient to both use and store than a bucket and a big old fashioned mop.
We had a lineup of six of them.
The prices ranged from $22 to $48.
And these are great for routine spills, daily life.
So that's how we tested them.
We spilled a little coffee on the floor.
We tracked in some dirt and some mud on the floor.
And we also smeared honey and heavy cream.
And those were all on tile floors.
-All right, so all these work with both hardwood and tile.
-Yeah, I get the sense you're kind of itching to do a little mopping, Julia.
-My trigger finger is already wanting to squeeze this handle.
-I am going to facilitate this for you with this cup of coffee.
I'm going to spill a little.
-Happens most mornings.
This is real life for me.
All right.
Just a little spray.
Ooh, that's a good spray.
All right.
Ooh, this is a good one.
-Nice, huh?
-I like it.
I like it.
You know what I like?
Is it does this.
-Yeah.
-Super agile.
-You know, in our test, the effectiveness came down to the pads largely.
-Most of them are made from microfiber, which is a super absorbent fabric that's made from little tiny fibers of polyester and nylon.
Testers really liked when there was a double thick pad because it was more absorbent.
Testers also appreciated when a mop came with multiple pads... -Yep.
-So that you're in the middle of cleaning, you can just swap out the pad.
You don't have to worry about cleaning it, anything like that.
It was nice when they were machine washable just for convenience.
-Yeah, absolutely.
-And in terms of effectiveness, size helped.
The range in the lineup was 11.5 to 18 inches.
Anything that was 15 inches or longer, you can see that purple one right there, that was one of the smaller ones.
-Oh, yeah.
-Not going to cover as much ground as a bigger one.
-Nope.
-In terms of the handle length... -Mm-hmm.
-...there was only a variation of about 4 inches, 48 inches to 52 inches.
Testers preferred them a little bit longer because there was less bending involved.
-Yep.
-In terms of the grip and the trigger, bigger was better.
A more generously sized grip, like that one, was more comfortable.
A more generously sized trigger allowed testers to put a couple of fingers around it instead of just one.
-That's important to me.
-Try that beige one there.
That was one of the smaller ones, and that was less comfortable.
-Oh, yeah.
-And the last thing was weight.
That one was about 2 pounds.
-Yeah.
-Testers felt like it was a little too light.
It actually glided over the mess.
-Oh, yeah.
-Heavier ones like this one, this one's closer to 4 pounds, and that was still light enough to be agile and maneuverable, but it had a little scrubbing power.
It did a little of the work itself.
-Oh, I can feel that.
-Yeah.
Now, if you're someone like me who would rather make the mess than clean the mess, really the only fun part of using a mop is spraying.
And we liked mops that had further wider spray.
-Yep.
-Like this one.
This one, if you squeeze the trigger the whole way... -Mm-hmm.
-...it sprayed up to eight feet.
If you just squeeze part of the way... -Oh, a little -- -...closer.
So it's adjustable based on how hard you squeeze it.
-I love that.
-This one is actually our winner.
There's another right down there.
-One for you, one for me.
-This is the O-Cedar Pro Mist Max Microfiber Spray Mop.
I think it's going to be your new spray mop.
-Mm-hmm.
-And it's a little over $31.
-Oh, and not too expensive.
-No.
-Thanks, Adam.
There you go.
If you're in the market for a new spray mop, check out the O-Cedar Pro Mist Max Microfiber Spray Mop.
It's just $31.
[ Chuckles ] Vroom, vroom.
-[ Laughs ] ♪♪ -Cheesecake dates all the way back to the ancient Greeks who pounded cheese into a pan with honey and wheat.
Cheesecakes also appear in colonial American recipe collections.
Martha Washington's cookbook contained three different cheesecake recipes.
Today, there is no shortage of cheesecake styles.
New York, regular, no-bake, Japanese.
But one version has taken the world by storm.
A Spanish-style cheesecake that is famous for its burnished dark exterior.
At "Cook's Country," we traced this trendy Basque cheesecake to its origins at La Viña Restaurant in Donostia, San Sebastian, Spain.
La Viña was opened by the family of chef-owner Santi Rivera in 1959, and by the 1990s, he was running the kitchen.
One of his objectives was to perfect his family's cheesecake recipe.
Cut to the present, and Santi's cheesecake has become a global sensation.
Chefs, journalists, and bloggers around the world have celebrated, imitated, and reinterpreted La Viña's cheesecake.
And here at "Cook's Country," we're adding our own tribute to the La Viña cheesecake pantheon.
♪♪ -The cheesecake at La Viña Restaurant in San Sebastian has become a global sensation, thanks in part to social media and the explosion of gastro tourism, which I love because I've never been to San Sebastian.
But today Bridget is going to show us not only how to make it, but I'm going to eat it.
-That's right.
We're bringing San Sebastian to you.
-I love it.
-And to me.
And it was our friend Nicole, our colleague here.
And she's so passionate about this cheesecake.
She was lucky enough to eat at La Viña, and she developed a great recipe.
This cheesecake is very different from a lot of the cheesecakes that you and I have made over the years.
Think of like New York cheesecake.
-Yeah.
-You've got that crumb coating a little bit of a brown top, but you want an even texture all the way through.
-Custardy.
-Exactly.
Well, this particular cheesecake has no crust.
-Oh, I didn't know that.
-Yeah, just a natural crust that happens with the sugars in the cheesecake itself.
-Huh.
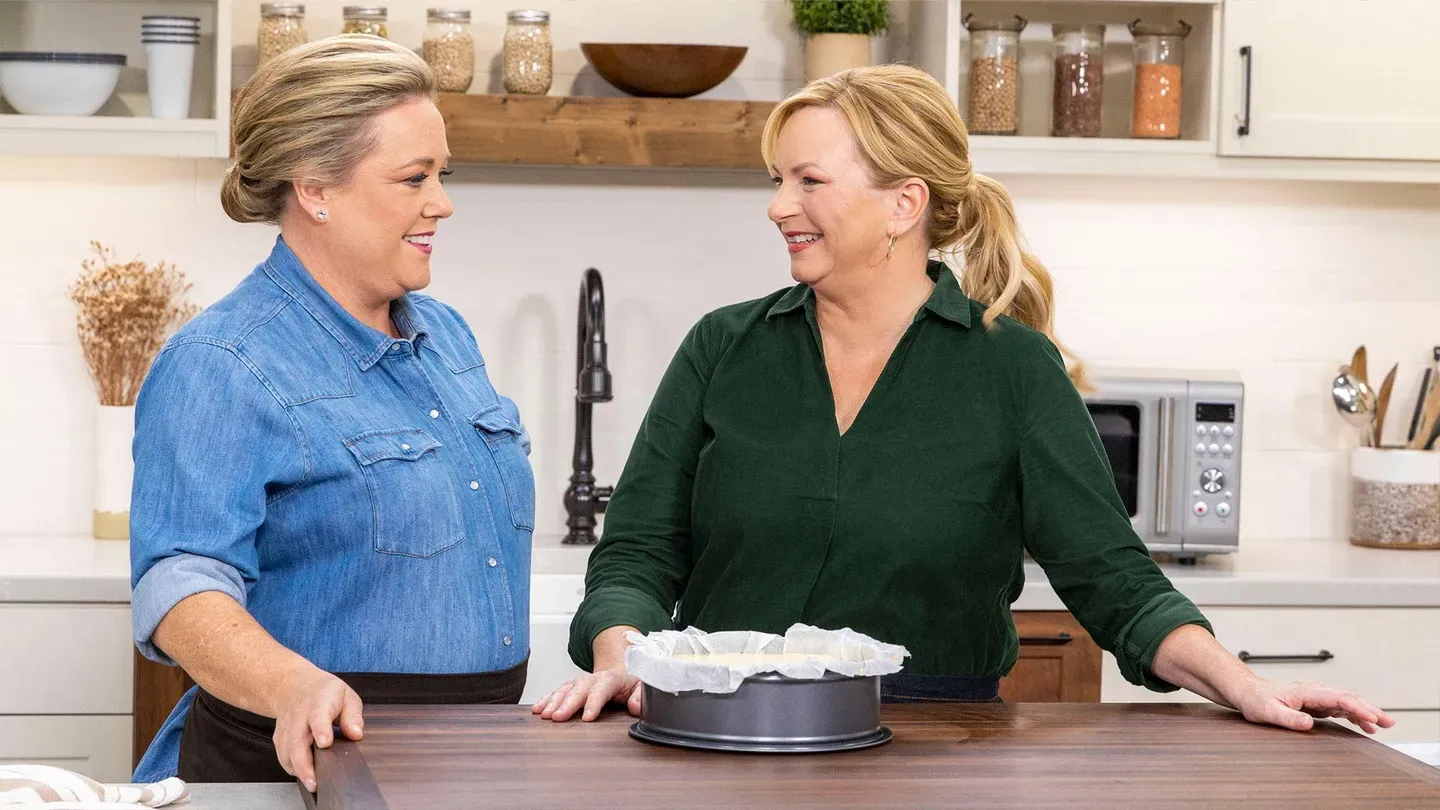
-So we do need to line the pan because otherwise, it's going to get really difficult to get it out.
-Mm-hmm.
-So I've got two sheets of parchment paper.
These are 16 by 12 inch sheets.
Now we're using a 9-inch cheesecake pan.
Now, first thing we want to do is we want to make this parchment easy to put into this pan.
So I'm going to crumple both of these just a little bit, kind of make it a bit more supple.
-Okay.
-It's going to be loud.
-I'm going to do it, too.
All right.
And now a little bit of water.
Again, we're making these pieces of paper a bit more supple, but also it's going to help these two things stick together.
I'm just going to overlap the two pieces of paper... -This is wild -...to make a 16 inch square.
But feel that.
Feel how much more supple that is.
-Absolutely.
-Yeah.
It's bendable.
-Yeah!
-So this is going to go into our pan just like this.
So I'm just going to press into the corners here.
-All right.
-I do need to trim some excess here.
We want about an inch outside of the perimeter.
All right, we're just going to set that aside for a moment.
-Okay.
-Let's actually make some cheesecake.
-Okay.
-Like most cheesecakes, there isn't a huge ingredient list here.
So it really is about ratios, proportions.
That's going to give us the final texture that we want.
And this is a little bit different from a lot of other cheesecakes.
We're not looking for a fluffier texture.
We're looking for actually a little bit dense, very creamy in the center, and more well cooked around the edge.
So putting the cheese and cheesecake.
But what's really important is that the ingredients are room temperature, between 65 to 70 degrees, in order to give us the texture that we want.
So we're starting with eggs.
I'm using seven large eggs right out of the fridge, and I put them in some warm water about five minutes just to take the chill out.
And I've already cracked four here.
Let me just get the remaining three.
Now we're using a big food processor.
You want one that's at least 14 cups.
Again, this makes a lot of batter.
So all the eggs, seven large, goes right in there, as well as 2 cups.
That's 14 ounces of granulated sugar.
So we're going to let this go for about a minute until the mixture looks nice and pale.
All right.
So that's looking good.
Nice and pale.
We're going to add some more richness to this.
A lot more depth.
This is a cup of heavy cream, and it does look rather thick, but that -- -Looks like sour cream.
-It does, doesn't it?
We let it sit out for a while to take the chill out, and sometimes with really good quality heavy cream, this is exactly what will happen.
All right.
So I'm going to add this in to my food processor.
All right, and another ingredient we have here is one quarter cup of all purpose flour.
-A little bit of structure.
-A little bit of structure.
So again, that's a quarter cup.
And then finally... -Ah, the main ingredient!
-The cheese.
2 1/4 pounds of good old Philadelphia style cream cheese, which is... -Hello!
-...what they use at La Viña.
-Huh.
-We let this sit out, take a little bit of the chill off.
You don't want to put this in the microwave to soften it because it can change the structure of cream cheese.
-Yep.
-So that's 36 ounces, if you're doing the math.
-You need a big food processor.
-Exactly.
So I do want to pulse the cream cheese in before we let it process just to give it a chance of being a bit more evenly distributed.
So 8 to 10 pulses should do it.
That was eight roars.
But you could see it's definitely not smooth.
You got a lot of lumpiness in there.
Kind of looks like a mistake at this point.
So we're going to let this go for two minutes until it's super smooth.
-Well, that's long.
-Yeah, but about a minute in, I'm going to go down and scrape everything.
We want to make sure every last bit of that cream cheese is worked into the batter.
-All right.
[ Whirring ] -All right.
That was just about a minute.
Again, I definitely want to scrape.
It's so luxurious.
I do want to point out what is not in here.
What is not in here is vanilla.
-Yeah.
-There's no lemon zest.
-Unh-unh.
-Really it's all about the cream cheese, that little bit of heavy cream.
That is the flavor that really comes to the forefront.
All right.
So I'd say another minute.
Nice and smooth is what we're looking for.
[ Whirring ] All right, so let's get this over to the pan.
Isn't it gorgeous?
-Yeah!
-This goes into our prepared pan, nice and full.
-So the crinkles on the parchment on the side, that's going to show up in the final cheesecake.
-Sure is.
It's going to be beautifully rustic.
-Ooh, I see some bubbles coming up.
-A couple of bubbles are fine.
I don't really want to whack this too much.
Now, what you don't see here is a kettle full of water getting ready for a hot water bath.
-Good point.
-Yeah.
Often, cheesecakes are baked in a hot water bath, and that's to regulate the temperature so the outside and the inside texture is exactly the same.
-Right.
-We're going to lean into the beauty.
We're going right into the sun.
-[ Laughs ] -We're flying right there.
We are changing everything up here.
And this is how they do it at La Viña.
Really hot, hot oven.
So we're going to put it on a rimmed baking sheet.
And that's just really to make it easy to get it in and out of the oven.
Now it's a hot oven -- 425.
-Ooh.
-Yeah.
So sometimes we'll see temperatures close to that for something like a New York cheesecake when we want it to be a little bit tan.
But we want this to get really, really dark.
So 425.
Again, no water bath.
We're going to leave this in there until the center is 155 degrees.
It's going to stay in there for 45 to 55 minutes.
But as always, it's a good idea to check a little early.
-Okay.
-Oh!
My goodness.
Oh!
-Oh, wow.
-"Oh, wow" is right.
-That cake got a good suntan.
-Yes.
Nice, deeply caramelized color.
Now, I do want to give it a little wiggle.
-Oh, look at that.
-Just a little bit.
-Well, it looks like the top is souffled, but the center is definitely more jiggly than the edges.
-That's right, and I am looking for a temperature, again, of 155 degrees.
That is really the test whether this is done.
-And that's in the center?
-That's in the center.
-On the nose.
-Looking good.
Now we're going to leave this here for a couple of hours.
We want it to cool.
It's actually great to serve at room temperature.
So we're going to leave it for two hours.
But after that, if you wanted to cool it for two hours, then put it in the fridge for up to two days.
It's cutting time.
-All right.
-All right, so I have a knife here and some hot water.
-Mm-hmm.
-I'm going to dry it off.
I'm just going to make it easy to slice through this cake.
It's already easy to slice, but it just makes really nice, neat slices.
But I am expecting some creamy center there.
-Okay.
-Yes.
All right.
I'm just going to dip it in between each slice through here, dry it off.
So let me give you first piece.
-I'm dying to see the texture on the inside.
Oh!
-Look how creamy that is.
-Well, you can definitely see the different textures from the exterior to that interior.
-And if the cheesecake wasn't enough, I've also got some Basque cider salted caramel sauce.
You can find the recipe on our website.
There we go.
Oh, look at that.
-Oh, hello.
I've got to go right in here.
-Mm-hmm.
-I'm going to get the top layer.
Man!
It's like caramelized cheese on the top.
-So many cheesecakes that have flavorings added to it, almond or vanilla.
This is just absolutely pure, beautifully caramelized cream cheese.
This is what cream cheese was always meant to do, was this.
-[ Laughs ] -This is the moment for cream cheese.
-Bridget, this is spectacular.
-Mm.
-Thank you for showing me how to make this.
-I think we still need to get over there to San Sebastian.
-Yes.
-But in the meantime.
-Yeah.
-It's great.
-If you want to make this simple but spectacular cheesecake, start by lining a springform pan with damp, crumpled sheets of parchment paper.
Use room temperature eggs, heavy cream, and cream cheese, and bake in a hot oven without a water bath.
From "Cook's Country" by way of San Sebastian, an incredible recipe for La Viña style cheesecake.
You can get this recipe and all the recipes from this season along with select episodes and our product reviews at our website.
CooksCountry.com/tv.
This is a game changer.
-I'm never going to make another cheesecake again.
-Mnh-mnh.
-Visit our website, where you can sign up for the free "Cook's Country" e-mail newsletter.
For even more of the recipes and stories you love from the magazine and the TV show, cookscountry.com/cooks.
♪♪ Want more "Cook's Country"?
Subscribe to "Cook's Country Magazine."
Every issue includes guaranteed fail-proof recipes, "On the Road" stories, eight "Dinner Tonight" recipe cards, trusted reviews, and more.
Get one year of "Cook's Country" for $19.95.
To subscribe, scan the QR code on your screen or visit cookscountry.com/TVsubscribe.
♪♪ ♪♪ ♪♪ ♪♪ ♪♪ ♪♪ ♪♪


Support for PBS provided by:
Cook's Country is presented by your local public television station.
Distributed nationally by American Public Television