The Best of the Joy of Painting with Bob Ross
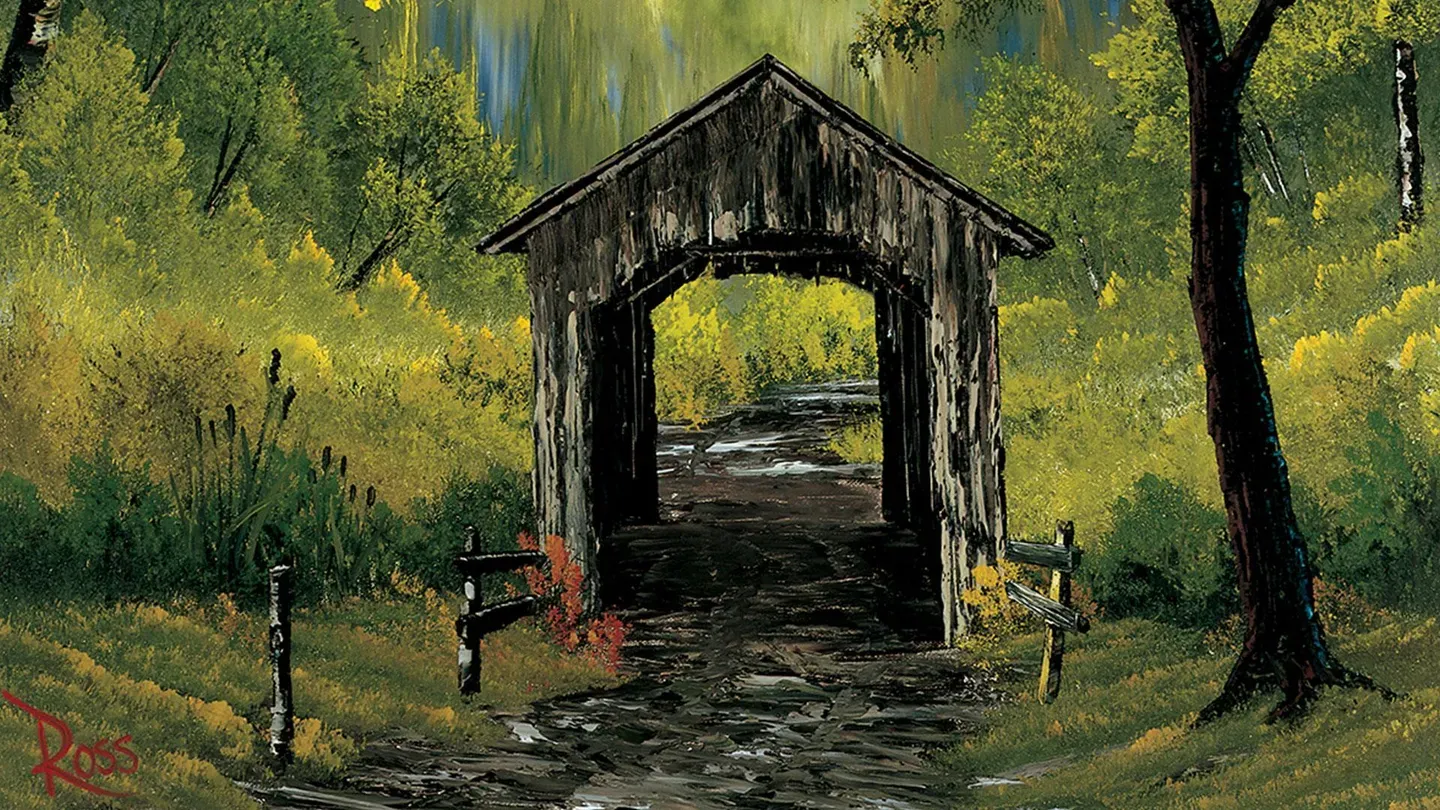
Covered Bridge
Season 40 Episode 4029 | 26m 33sVideo has Closed Captions
Bob Ross paints a country covered-bridge, a painting you won't want to miss!
Bob Ross paints a country covered-bridge without disturbing the lovely forest background. A painting you won't want to miss!
Problems playing video? | Closed Captioning Feedback
Problems playing video? | Closed Captioning Feedback
Distributed nationally by American Public Television
The Best of the Joy of Painting with Bob Ross
Covered Bridge
Season 40 Episode 4029 | 26m 33sVideo has Closed Captions
Bob Ross paints a country covered-bridge without disturbing the lovely forest background. A painting you won't want to miss!
Problems playing video? | Closed Captioning Feedback
How to Watch The Best of the Joy of Painting with Bob Ross
The Best of the Joy of Painting with Bob Ross is available to stream on pbs.org and the free PBS App, available on iPhone, Apple TV, Android TV, Android smartphones, Amazon Fire TV, Amazon Fire Tablet, Roku, Samsung Smart TV, and Vizio.
Providing Support for PBS.org
Learn Moreabout PBS online sponsorship[Music] Well, here we are again, ready to go.
So today, I think I'll do a painting that's a little bit different.
Maybe, we'll try to do a little covered bridge.
I've been spending a lot of time in Indiana the last few months and we produce the series here in Indiana, so let's do a little covered bridge.
Indiana has a lot of covered bridges, so we'll start with a little bit of alizarin crimson and Prussian blue.
Just mix them on the brush here.
And, let's just go right up in here and do like so, just put in a little background color.
There we are.
I'm not worried about shapes or anything here, I'm just applying some background color.
Something like so.
This is just a little Prussian blue and alizarin crimson, now the Prussian blue is many, many times stronger than the alizarin crimson, so use very little of the blue.
Okay, we'll wash the brush, and I want to put some little trees that are far back in the background.
Okay, let's start with a one inch brush and let's just go right into some cad yellow, some yellow ochre, just mix them up here a little bit, and a little tiny bit of permanent red.
Maybe we'll have a little fall scene here with a lot of colors in it.
Okay, now let's just go back in here and just begin picking out some basic little shapes, just barely touching and pulling down.
I'm going to add a tiny bit of sap green to that, still a little bit of green left back there.
Okay yeah, oh yeah, that's much better, that stands out better.
Then we just lay in some little basic shapes, far, far back.
We're not looking for detail.
That'll come later.
And, sort of vary your colors, so they stand out a little bit.
Don't kill all the little purplish color that you have here.
You want to retain some of that.
Just let it work down.
A little more green there, sap green.
There.
Should be something like so.
Distant, distant background.
And just, as I say, vary the colors a little bit, so they stand out.
There, nice yellow.
Okay, now we'll take the large brush and very gently, I'm just going to lift upward.
Just to soften this, and make it look further away.
There we go, and that'll give us a quick, little background.
Now, let's take the large brush and we'll go right into some sap green, a little bit of alizarin crimson, and some Van Dyke brown.
Just mix them on the brush.
Looking for a pretty dark color here.
And we can begin dropping in some basic shapes.
Really push that brush into the canvas, make it bend.
Okay, maybe way up in here.
There we are, all kinds of beautiful little shapes, just let them fall off your brush.
That's alizarin crimson, sap green, and a little bit of Van Dyke brown, maybe there's a nice tree here, that just sort of hangs over.
All background, so we're really not worried about detail at this point.
There we go.
And that gives us some nice, basic background shapes.
Okay.
A little bit more, right over in here.
All righty, now we can start playing with a little bit of detail.
Take a little Van Dyke brown, a tiny bit of umber in it, and we'll just put a happy, little tree trunk, right here.
And, like so.
And there, give him a little arm, out here.
And most of this is going to disappear, we're really not worried too much about it.
Some of it will show through the leaves, when we put them on.
And, we'll take a little bit of white, and add the same color to it, and we'll make this little highlight.
This is just white with a little bit of brown, a little bit of umber in it.
Just put some little indications, here and there.
Maybe there's a few more little things that live back here.
Just indications.
Maybe over here is a nice little tree.
Give him a little trunk, too.
Don't want him to be left out.
There we go.
Okay, now we can go in here and we'll take a little bit of cad yellow, sap green, and we can begin laying some highlights on these.
Touch, push the brush upward to make it bend a little bit.
The brush needs to bend.
Very quiet, don't want it to get too bright yet.
We'll brighten it up in the foreground.
Okay, drop a few little things down in here.
A little bit of yellow ochre, just so that one stands out.
Here I'm using the brush sideways and making it bend upward, just to create all these nice little grassy things.
And, we do them in layers, starting in the back and working forward.
Okay, let's move over to the other side of the canvas here.
And, we can begin putting some leaves on some of these little trees and bushes.
Okay, there's one right there.
Using the brush sideways again, to create little grassy areas.
And, let's go up here to this old, big tree, put some beautiful little leaves on him.
There we are.
Let's just drop them in.
It's your creation.
I added a tiny bit of paint thinner to my brush there, just to thin the paint down, so it'll stick easier.
Ooh, a lot of nice foliage here.
Give you some good practice.
Let's go right in here and drop in a few more little bushes and stuff, to stand out.
There he is.
Okay now, maybe back here, in the background, maybe there's a little road.
Maybe it just goes right around the corner back here, and it just comes right out like this.
Straight Van Dyke brown to start with, put the dark on, so the light will show.
Okay now, we can take some brown and white.
I want to put a touch of blue into it, just a touch, just a touch.
And then, lay a little bit of highlight on here.
An old road that goes through the woods.
Now, with a little, tiny bit more of the yellow and green, I want to set that road down into the painting.
Let some of the bushes come up over the road.
That helps create the illusion of distance, like it's going back around the corner.
We don't know where it's going, don't care.
Just let it go.
All righty.
Now, I'm going to go back into some good, dark color here, sap green and Van Dyke brown.
Maybe this time, we'll even add a little bit of Prussian blue to it, to really darken it up.
And work right in here, throw some very, very dark color, mostly green, though, very dark.
And, some on this side.
So, that's Van Dyke brown, sap green, a tiny, little bit of Prussian blue.
You want this to be very, very dark.
Okay, I think it's time we started playing a little bit with the bridge.
This is where the fun starts.
And, probably one of the easiest ways for you to learn how to do these fantastic little buildings and bridges and stuff.
Let's go in here, and very gently, let's just scrape out a basic shape, and maybe we're looking at a covered bridge, and we're looking right through it, so we can see the road behind it.
So, let's go right up in here, and just take and lay in a very basic shape.
[chuckles] And I know this is going to, this is going to drive you up the wall, when you start scraping out all your beautiful painting.
And, I don't want to kill all this, I want to be able to see it through the bridge.
So, we'll just take that, and try to save quite a bit of it here.
I want to be able to see through it.
So, just scrape out your basic shape.
Like so.
This gets rid of some of the loose, thin paint and makes the next layer of paint stick much easier.
This will help you.
It's also a nice way to sort of lay out your perspective, a little bit.
Okay, now we can go right into some Van Dyke brown, and let's go right up here and begin building our little covered bridge.
There we go.
You know, just recently I found out, while I was here in Indiana, why they built covered bridges.
I always thought it was a place you could go and get out of the rain or something.
And, the reason they covered these bridges was to protect the structure, so the weather wouldn't get to it.
It really wasn't the reason I thought it was, at all.
So, I learned something.
Okay, here I'm going to just lift upward with a little brown.
All I'm going to do is, fill all this in with the brown.
And then, we can begin working on detail.
Just fill in the entire thing with nothing but Van Dyke brown.
There we go, make us a nice edge, [Bob makes "ssst" sound] right down like that.
Firm that edge up.
And this old bridge, he's had a hard life.
He's not in the best of repair.
Give him a side over here, and one here.
There we go.
Now, we can just fill all this in.
[Bob makes "tchoo" sound] That's the beauty of using a big knife, you can just drop things right in, no problem.
Okay, now we have to do this bridge in stages.
And, we do the part that's farthest away first and come forward.
So, I want to be able to see through this bridge, so we'll do the back of it first, and then come forward.
Down here, we'll just fill all that in.
Just fill it in.
A lot of brown.
There we go.
A lot of brown paint.
There, I know you're sitting at home saying, "Boy, he's messed up this time."
And, you may be right.
Let's just see what happens here.
So, in the background, we want very, very little light back here, not a great deal's going to show, back here.
Just some little indications.
Don't overdo, just some very faint indications.
So, when we put the front of the bridge on, it'll show better.
Okay now, just put a little, tiny highlight here, this is just a little brown and white, just a little.
A little light playing around across there.
Don't want too much, just a little.
Now, we can start working on the front of the bridge.
And, take some brown, some Van Dyke brown, and some umber and white.
Make this look like old wood.
Don't over-mix your paint, leave it sort of marbledy here.
So, that way, all these colors will happen right here in your bridge.
Okay, now let's just take the small edge of the knife and begin making some boards.
Now maybe, maybe you can just scratch a line, right through here, if it'll help you a little bit to give you an idea of where you want the front of the bridge to be.
And, that'll be our stopping point.
So, we take the small edge of the knife, and just start making some boards.
This one's made out of old slab boards, just barely touching, pulling down.
There we are.
And, leave some space in between them.
As I say, these old bridges, some of them are in bad repair, they've really been beat to death.
Just want to make it look like old boards hanging here.
There we go.
Now then.
Let it come all the way down here.
[Bob makes "sshoomp" sound] Just put you some boards in.
Boy, that bridge has really had a rough life.
Okay, and we let these come all the way down.
Like so, there we go.
Now don't, don't cover up all the dark, because back in here we want to give the impression that we can see in and over.
Maybe, a little bit there.
Angles are very, very important here.
I'm going to make it look like we can see through this bridge.
Keep this very dark, because it's all in shadow here.
It's all in shadow.
Just come right on down like so.
Put all these old nice wood things in here.
Maybe, there's a little beam right here, that we can see.
It comes right across.
Okay, and now we can straighten up this edge a little, give him a little more distance, a little more depth in the bridge.
There we are.
This is just straight Van Dyke brown.
Now, if you wanted to, you can take a little bit of brown and create some boards here.
I've just got a little tiny bit of brown on the knife and just touching, just to create the illusion of wooden planks.
Look at that.
Did you ever think that an old covered bridge would be this easy to make?
And just, let a little of it run down.
Like so.
Now then, I want to leave this area right in here very, very dark, to make it look like there's a recessed area and water down there.
I might even take and add a little bit of brown, right down here at the bottom.
Really, really very dark.
Very, very dark.
And, we can just fill the rest of the canvas up here with a little bit of sap green, like so.
And, and, and you can.
Now, we'll come right along here and put a little bit of highlight on the road.
Just a little.
Okay, now with a, let's take the little liner brush and we'll take a little paint thinner and mix a little bit of this brown, till it's just like water, very, very thin.
And maybe, maybe there's some little cattails that live right here.
So, we'll just put in some little stems, like so.
And then, put the little cattail on there.
And, we just push real hard with the brush, [Bob makes "bloop" sound] and drop them in.
See how easy that is?
Just to give some little indications, make it look like there's water here, without actually seeing any.
There we go, just a few little indications.
That's a nice one, [Bob makes "bloop" sound] put a little fuzzy thing up on him.
Okay now, let's take the old fan brush, I'm going to add a little of the thinner, to the fan brush to make this paint a little bit thinner, and load up some cad yellow, yellow ochre, and we'll put some sap green into it.
There we are.
And now, we can begin deciding where everything's at.
And maybe, there's some little grassy areas right here, that just come right down, right out in the front.
Just like so.
This old bridge isn't used too much any more, so the grass is beginning to take the road back.
Nature has a way of reclaiming things.
There we are.
Okay now, let's go over here and do basically the same thing, put in a few little highlights.
Leave this dark area, it'll make it look like water back in there, or like there's a recessed area where water could be.
This is where you sort of clean up all the edges and bring it together.
There.
Now.
And, no covered bridge painting would be complete, unless we had a big tree in it.
So, let's put a big old tree in it.
Start with Van Dyke brown and maybe the big tree lives right about here, big tree, a lot of brown.
And, we can just drop him right in.
It's your world, so you put a tree where you want him.
And, when you're doing this at home, don't worry about copying exactly what I'm doing here.
These are only guides.
They're only to give you ideas and to stir your imagination and to show you how to make the equipment work.
These are only guides.
Because everyone sees nature differently.
Put your dreams on canvas.
Okay, let's give him a happy little limb right out here.
There he goes.
And maybe, maybe, who knows?
Maybe there's a big limb and there it is.
It just comes right out and sort of shadows the bridge.
Keeps it nice and cool in the summer.
Just recently I had the pleasure of doing some demonstrations at a Covered Bridge Festival, here in Indiana.
And, I met some of the most super people.
Fantastic people.
There we go, just some limbs.
Now then, we can use a little brown and white, and I'm going to put a touch of permanent red in it, just to brighten up a tiny, little bit.
And, we'll come right in here and just put some highlights, right on this big tree.
There just let it go.
Like so.
Now next week, if you're going to paint along with us, we'll be doing a white canvas.
So, have your easel set up, a big, old glass of tea right there, beside you.
I'm an iced tea freak, I was raised in the south, and everybody there likes iced tea.
One habit I never got over when I moved to Alaska.
While we got this brown going here, I'm going to put a couple little, maybe there's a little fence, right here.
There, we'll put a little post there.
Maybe there's another one right there.
A little fence, you know.
Sometimes maybe, back in the horse and buggy day, maybe they'd had a little too much to drink and they didn't go through here too straight.
So, this was sort of, to guide them through, maybe.
There.
Maybe there's, I'm going to put one more post out here with nothing on it.
This one's already lost all of it's boards.
Then we'll add a tiny, little bit of highlight here, to make these posts look right.
There we go, just drop it on.
Isn't that fantastic?
Okay now, let's go up here and put some leaves on this tree.
We'll just use the old big brush, and I'll just use some sap green and Van Dyke brown.
And first, we'll put the dark in, just to give us some indications.
Just some indications, and then we'll come back and lay some highlights on all these.
There we go.
And maybe, there's a few lives right there.
Where ever you think they should be.
Now, we'll use a little bit of cad yellow, with the least, little amount of sap green.
And, I want this bright enough so it stands out.
Now, we can go back and lay some highlights right on here.
There, just let them fall off your brush, just here and there.
Oh, look at that.
It sort of brings the painting together.
The old covered bridge is standing there and the tree's just hanging over.
Maybe you're doing this at home, let your imagination go.
Think of a million little scenes that you can make out of this basic idea.
Okay, now we can sort of clean up the bottom and we're on the verge of having a finished painting here.
Put a little grass around the bottom of this tree, just to cover-up his little foots, big foots.
Like so.
And, I think we're about ready to sign this one.
So, I'll take a little bit of the thin oil, a little permanent red.
And there we are.
And, we'll just drop a happy little signature in here.
And, we hope you've enjoyed this painting half as much as we have.
It's really a pleasure being here with you and showing you some of these fantastic ideas.
And we hope we bring a little happiness into your life and give you some ideas.
And you too, will drag out your almighty brush and paint along with us.
So, from all of us here, we'd like to wish you, happy painting.
God bless, see you next week.
[announcer] To order Bob Ross' 256 page book with


Support for PBS provided by:
Distributed nationally by American Public Television