The Best of the Joy of Painting with Bob Ross
Mirrored Images
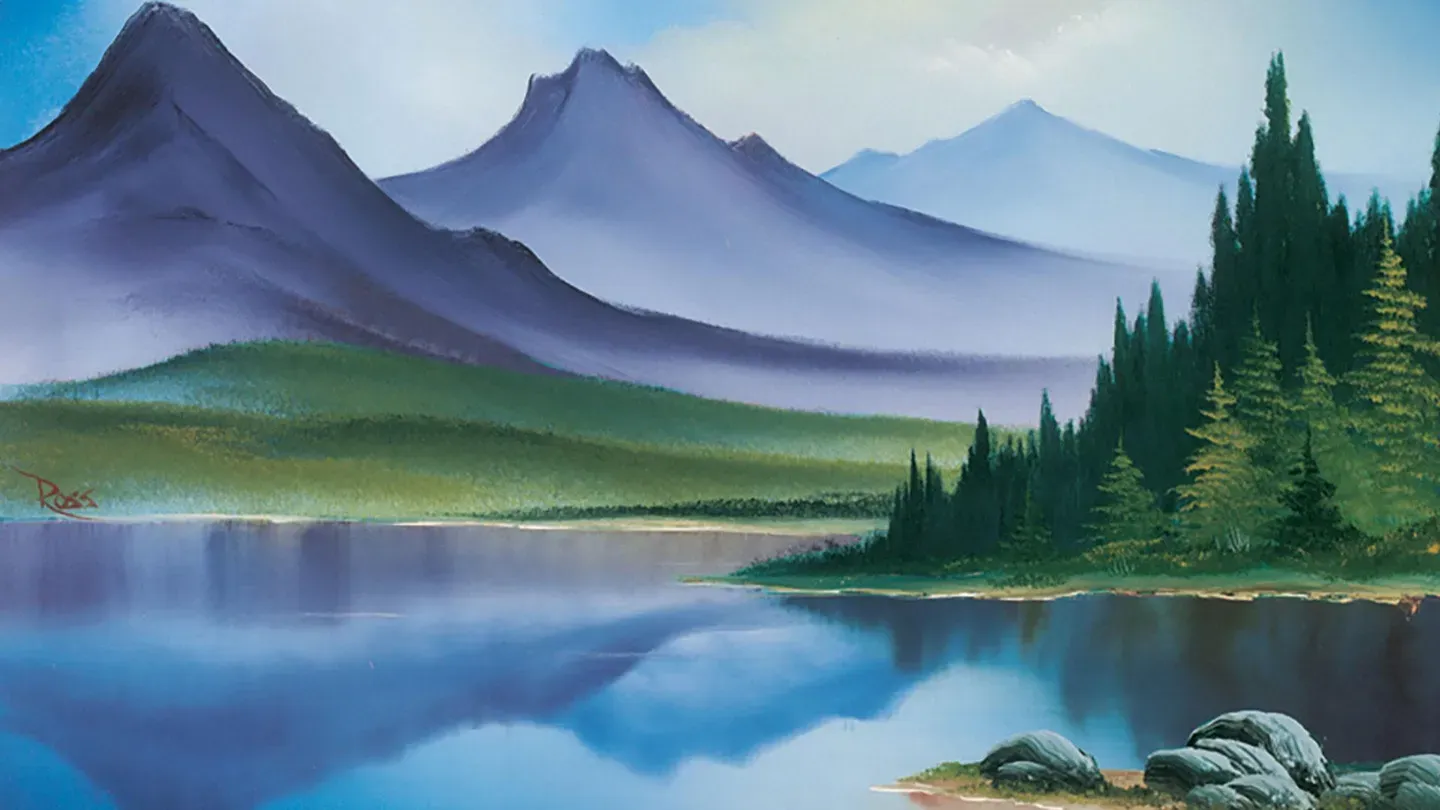
Season 38 Episode 3837 | 27m 26sVideo has Closed Captions
Join Bob Ross on a windless day where mountain reflections shine in the lake below.
Join Bob Ross on a clear, windless day where mountain reflections shine in the lake below.
Distributed nationally by American Public Television
The Best of the Joy of Painting with Bob Ross
Mirrored Images
Season 38 Episode 3837 | 27m 26sVideo has Closed Captions
Join Bob Ross on a clear, windless day where mountain reflections shine in the lake below.
How to Watch The Best of the Joy of Painting with Bob Ross
The Best of the Joy of Painting with Bob Ross is available to stream on pbs.org and the free PBS App, available on iPhone, Apple TV, Android TV, Android smartphones, Amazon Fire TV, Amazon Fire Tablet, Roku, Samsung Smart TV, and Vizio.
Providing Support for PBS.org
Learn Moreabout PBS online sponsorship[Music] Hi, welcome back.
Certainly glad you could join us today.
I thought today we'd just do a fantastic little painting that I think you'll enjoy.
So let's start out and have them run all the colors across the screen that you need to paint along with us.
While they're doing that let me show you what I've got going up here today.
Today I have my standard old pre-stretched, double-primed canvas, and I've just covered it with a thin even coat of the liquid white, and as you know, the liquid white is there just to make the canvas slick, so we can literally blend the color right up here on the canvas.
So let's start out today with a little two-inch [chuckles] brush, and just see what we can do.
I'm going to take a little bit of the phthalo blue, just take, pull a little bit of it out, a very small amount, and just tap the bristles into it.
This assures a nice even distribution of color all the way through the bristles, and that's what we're looking for.
so let's go right up in here.
Maybe we'll just start up here, and just make little criss-cross strokes.
There.
And the blue is continually mixing with the liquid white so you get all the different variations, and it's very slick, and it just, it slides right onto the canvas.
There, let me get a little more of the color, and we'll go over here on the other side, and put some over here.
We don't want it left out.
Alright.
Just making little X's though, little criss-cross strokes, something about like that.
I'll tell you what, maybe, maybe today we'll put a little cloud in there.
I'm just going to leave a little area sort of open, and that'll end up being a little, little cloud maybe.
There we go.
Now then, while I have that old color on the brush, let's have a little water in this painting.
If you've painted with me before, you know that water is one of my favorite subjects, and I hope it is yours, so let's, let's take that same blue, and come from the outside inward, toward the center, like so, we'll have, hmm, somewhere down here, we don't really care, anything that we don't like we'll just cover it up.
Let's go on the other side, pull from the outside in.
There.
Now if we leave a, a little area unpainted, right in here, it'll look like a sheen of light coming across the water.
There we go.
Now then, one thing that I'd like to do in this painting is darken the edges a little bit, so it brings your eye into the center of the painting.
For that I'm going to use a little phthalo blue, or, I'm sorry, a little Prussian blue.
Prussian blue is a darker blue.
There.
Put a little bit right over in the corners here.
I'm going to put a little bit and, basically in all four corners, just to darken the corners up.
Once again, that, that will help bring everything when you're looking at it in toward the center.
Alright, a little bit in the water also.
[chuckles] We don't want him left out.
There we go.
Just a little.
And over here, a little bit in there.
Now then, let's wash the old brush.
That's the fun part of this whole technique.
We scrub our brush with odorless paint thinner, and shake it off, and [laughs] just cover the whole room.
Just cover the whole room.
That really is the fun part of this.
Now with a clean, dry brush, I just want to begin blending this.
I'm going to start in the light area, and blend outward toward the dark area.
That way we will retain the dark out on the outside edges.
Now, you can just beat the brush to knock off excess paint that you pick up, and you don't have to go through the whole cleaning procedure again.
There.
Something about like that.
Down the bottom, just very gently go all the way across.
Something like so.
And, we're ready.
Now then.
Today let me show you just a very simple, easy little way of making some very effective clouds.
I'm going to use another two-inch brush that's clean, and I'm just going to tap the corner just tap the corner, you can see it there, into a little bit of the titanium white.
Okay?
Now then, using that same corner, and just the corner of the brush, I'm just going to tap in some very basic little shapes.
Just tap.
Just tap, and the more you tap, the more diffused it will become, so you have to make a decision about how much you want or how little that you want.
And this is a very individual way of painting, since we use no tracings or no patterns everybody's going to see it a little bit different, and that's what makes it wonderful.
You don't want to just copy what somebody else has done.
Shoot.
There.
But see how easy that is?
All you have to do is just tap.
A little bit right in here.
Maybe we'll have a huge cloud.
This is a nice way of making clouds for big seascapes, where you want, where you want the big fluffy clouds out over the water.
Okay, and you can put all kinds of little colors and...
Shoot, let's take a little tiny, tiny amount of Indian yellow.
Just a very small amount, just to give a little sparkle, maybe a little sunlight right in there.
There, get a least little touch of alizarin crimson, least little touch.
But you can put all kinds of little flavors in your clouds, all kinds of little colors.
We just sort of let that disappear right on off into there somewhere.
We don't care.
But think about basic shapes here, just don't hit at random, and the more you tap, once again, the more diffused it becomes, the softer.
You can make clouds that are very distinct this way, or just very, very soft that you hardly see.
They almost blend into the sky.
Now I'm going to take a little, I'm going to take a little phthalo blue and a little alizarin crimson, just mix it on the brush.
Very, very small amount.
Very small amount, and I'm just tapping, once again.
Maybe at the base of this little cloud here, we'll just put in a little bit of color.
Something, and I'm going to tap and blend all that together.
Just a little, right in here.
Okay, now let me wash the old brush.
I just like to wash the brush.
Alright.
[laughs] Shake it off and we'll cover the whole crew again.
Now, very gently, you can just tap and bring all these colors together.
Something like so.
There.
I want this cloud to sort of just disappear over here.
So the more you tap, once again, the more diffused it'll become.
The softer, more gentle, until it just disappears.
Now then.
With a brush that's clean and dry, very lightly, just tickle it.
Just sort of make little tiny, using the top corner, little tiny criss-cross strokes.
Just enough to sort of blend it together, and it softens everything even more.
There we are.
Now then, very, very ,very gently, we're just going to fluff it, lift it, blend it.
There, we got a little hair on there, we'll just take the corner of the brush and lift him off.
But isn't that a fantastic way of making a gorgeous little cloud?
And it's very easy, even if you've never painted before, this one you can do.
Alright.
I thought today, we'd make some, some little ranges of mountains.
I've had quite a few requests for little mountains that are soft and far, far away, and I want to show you an extremely easy way to do it here.
I'm going to mix some phthalo blue, and a little bit of alizarin crimson.
Not much, I want this to stay mostly blue, and a little white with it.
I want to make a... basically I'm making a light blue with just a, just a hint of lavender in it.
Something about like that.
Cut off a little roll of paint, let's go right up in here, and maybe back over in here we have a little mountain that lives way back, something like that.
There.
Very little paint, and then scrape the canvas just as firmly as you can.
Take of all the excess, and we'll use a two-inch brush, that's clean and dry, and you grab it and you pull, because the liquid white's on the canvas the paint will move, it will literally slide on there, and then we can just blend the base of it out until it looks like it's just sort of floating around in the sky, and that's what really makes it pretty.
They always have mist at the base of the mountain, and that's exactly what we're looking for.
I'm just knocking off the excess paint, and then you can blend the entire thing very easy.
And you can blend this to any degree of softness that you want.
There, that old mountain just sits up there in the clouds and it really has a view-and-a-half.
Okay, and that's about all I'm going to do to that one because if you put a lot of detail, then it's not going to look like it's far away.
It's going to come closer and closer.
Same color, just your crimson, phthalo blue and white, but now I'm going into a little more of the crimson.
This has a little more purplish hue.
A little roll of paint, right on the edge of the knife, come right up in here.
Let's come right here, and do another one, right in there.
We have a little mountain now that lives right about there.
This one's a little darker, and a little more into the lavender hue, and you put as many bumps and ridges as you want on there.
It's up to you.
This piece of canvas truly is your world, and in your world, you have total power.
See.
Once again, scrape off all the excess paint.
The canvas is stained.
You couldn't get that off if you wanted to now.
So don't worry about taking all the paint off.
I don't believe you could if you scraped all day.
There.
And once again, we'll begin pulling that out.
But on this one I want to begin leaving some indications that there's highlights and shadows.
It's a little closer, so maybe there's a little detail, and you can do that just with the brushstrokes, just using brushstrokes.
All it takes.
You really don't have to do another thing other than the brushstrokes.
There.
Brushstrokes, that's the name [chuckles] of our newsletter.
That's a lot of fun because in the newsletter I'm allowed to to, to talk and write about things that I'm not here, and I have unlimited time.
There.
But see how that sort of gives the indication that you can see things happening in that mountain without doing a thing.
There.
Now then.
Shoot, let's get crazy.
We got a spot over here.
I'm going to take a little bit more of the blue and the crimson, same colors, same colors, more into the lavender hue now, but darker.
Each layer should get darker.
In fact you can add a little midnight black in there if you really wanted to to make it darker if you've put white in there and you want to save that color.
Our little roll of paint once again.
Let's go right up in here, and maybe, maybe, got to make a big decision, maybe there's a taller one.
Lives right there.
It's up to you.
Really and truly is up to you.
There.
You just make them wherever you want them.
There.
This is a nice way of doing the mountains and stuff that are in the Carolinas and all up through there.
They're absolutely gorgeous.
Absolutely gorgeous.
Especially up around Asheville, North Carolina.
Ooh, you could get crazy there, but this is a very simple way of indicating those type of mountains.
Once again, our large brush and pull.
Just pull it, but notice that it's darker.
That's so important.
I know you get tired of hearing me say that, but if they're, each layer, does not get darker as it gets closer to you, you'll lose that illusion of distance and depth in your painting.
There, as you know I'm sort of a fanatic for having distance in painting, and depth in it.
Okay, once again we can pull to create those illusions of highlights and shadows in there, and sometimes you can take a little bit of the original color, maybe I'll even add a little more black to it to make it a little darker, and maybe you want to emphasize a little thing here and there.
Maybe there's another little thing, a little peak right here in the foreground, and you can do that, just by adding a little color in here and there, you can put a few little things.
These are closer to you, so you would see more.
And once again, take the big brush, grab it and just pull it.
You're basically only worried about this nice top edge.
That's what really makes it work.
There.
Something about like that.
Okay.
I'm just going to take that brush and tap it right into the mountain color, maybe, maybe there's a tree line, or where the trees grow up the side of the mountain here that we can see.
So very lightly, we can just tap.
Just tap, like that.
I want this to be a little fuzzy on the top, and then blend downward.
Then you can lift slightly upward.
It'll make it look like little trees that live on the side of the mountain, way, way, far away back here.
Somewhere back in the distance.
We don't even know where it's at.
It's a secret little place.
There.
It's a place for all the little creatures hiding.
There we go.
There.
But sometimes you can... watch here, you could just take this brush and form a whole nother little doer.
Let your imagination take you wherever you want to go.
I think that's what's so fantastic about painting is that you can create any kind of world that you want here.
It's up to you.
There's no boundaries here.
It's the reason I have so many young friends that paint.
Children have the most fantastic imaginations in the world.
They're not restricted, they can do anything.
There.
Something about like so.
And you can do layer after layer.
Look at all the depth that's... Watch, watch, watch, watch [laughs] I'm sorry, I get, I get carried away sometime with this, but it's exciting when you paint.
You begin seeing so many things.
So many things.
There.
See, another whole plane, but now maybe this is getting closer to us and we're, we're getting to the point now where we can make out a little color.
A little color, so I'll just take that same color and go into a little bit of yellow, ochre, a little of the cad yellow.
Maybe even get a little sap green on the brush.
Just tap that right in there too.
Maybe a little more of the green [sharp breath intake].
Ooh, that's nice.
That's nice.
Let's go back up here, and maybe, yes, right there, right there, look.
A little bit of color.
Greenery's growing all here and there.
Beautiful little foothill that lives right down here at the base of this mountain.
See, I want my cabin right back there so I can, I can look up and see all of these gorgeous things, because you know when you look across a range of mountains like that, certainly God was having a good day when he made it.
And what's left on the brush, very little here, you can just take and put the indication of a hint of color back in here.
I don't want a great deal, just a hint.
Just a hint.
A hint of green.
There we are.
Okay.
But there's a tremendous amount of depth in there now.
You can see back, all the way back to [chuckles] to forever right there.
Now let's reflect some of those back into our water, and I'll just use a little fan brush for that.
I just want to show you quickly how to, how to reflect some of those little things.
Let's start with the fan brush that has mostly phthalo blue on it, and let's go back to this first one here, and we're just going to put in a little basic shape idea here.
Put a little color in, just very little.
Okay.
Now the next one, we went into a little more of the, a little more of the lavender hue, so I'll do the same thing with the fan brush.
Get a basic idea of where this reflects.
There, something about like so.
And we'll just sort of lay in a little color right along like that.
Okay, and then the last one was quite dark.
So you just sort of, and these have to be bigger, just like the ones on top are.
Lookie there.
And if worse comes to worst, you can always turn your painting upside down and do this, it might be a little easier, but we're not looking for an exact representation because I'm going to blend most of it out.
I just want to reflect a little bit into the water here.
Not much, just a little, but there's very little paint here.
Very little paint here.
Now then, let me see.
We'll take this, I want to pull a little of that color down into the water too.
For that I'm just going to pull straight down.
Straight down.
[Bob makes "doop, doop, doop, doop, doop, doop" sounds] Like that.
Okay, brush with a little bit of the green on it, so it has a hint of color into the reflection also.
Now, normally when we're doing reflections we pull down.
I'm going to take a clean, dry brush this time and pull upward, because I don't want to pull all those lines down into the water.
I want to keep these fairly pure on the edge, and beat your brush off occasionally, just to get rid of any excess paint, and you can begin forming and shaping, and it'll look like reflections.
The whole range is reflected in there, and I'm using quite a bit of pressure, and sort of experiment a little bit.
Try a little pressure first.
If that didn't work, try a little more.
It's easy to add more, but if you start off real firm, and that's too much, it's hard to go back and reverse that.
So start with a little and build up.
Now very lightly go across, very lightly.
Something about like that.
Just enough to ripple it a little bit, give it a, a watery feel.
Okay.
And that's one of the simplest, easiest ways of reflecting things into the water.
Let's take a little white, I'm going to take a little dark sienna, maybe even a little Van Dyke brown into... Ooh, that's better.
A little yellow ochre too.
I want to make a little land back here in the distance.
So, cut off our tiny little roll of paint, very little, come right along in here, and I'm just going to put a hint of this sand color back here.
Soil color, whatever you want to call it.
There.
Just so it looks like there's a little bank, way back in the distance there.
There.
And a little touch of the liquid white, I'll pull it out very flat, cut across, and here and there and there and here we'll just put the indication of a little water line, and maybe even a few little things that are sort of floating across, right across the reflections.
It helps look like you're something on top and the reflections are underneath.
There we go.
Keep these lines basically straight, or it'll look like your water's going to run right [chuckles] out of the canvas.
Now then.
Let's get crazy.
Let's get crazy.
We've got to put something over here on this side, so let's take, let's take, clean off a spot to work, we're going to use some black, Prussian blue, Van Dyke, we'll even put some, put some alizarin crimson in there, and a little sap green, what the heck.
Basically all your dark colors, just throw them in there, it doesn't matter.
But might as well mix up a pretty good pile of paint.
Now then, let's use the old fan brush.
We'll go right into that and just load it full of color, we need a lot of color on the bristles.
Let's come right up here in the right corner.
Maybe in our world there lives, [Bob makes "toom" sound].
Maybe there's some little distant trees way back in here, and all we're doing is tapping downward.
I just want the indication of trees.
I don't want a lot of detail.
There.
Just the indication of some nice trees back in here.
If you get too much detail it'll ruin that illusion of distance.
So too much detail can also be disturbing to the eye.
I don't want to kill all the reflections, so I'll just go about like that, and we'll fill all that up.
There.
And maybe it comes right on out here.
Something about like that.
Maybe we'll take a two-inch brush, I'm just going to lift upward a little bit.
Just sort of blends all that together.
And, and while we have that color going, let's just pull straight down.
Pull all that color right into the water.
It too will reflect.
Straight down though, straight down, and then go across.
And that easy, we have instant reflections.
Tell you what, let's do, shoot, maybe here in the foreground there's some nice evergreens we can see.
We'll take the old fan brush, load a little, a little sap green, a little yellow ochre, Indian yellow, a touch of bright red now and then.
The bright red is a duller, it makes color duller.
And let's just put the indication of some nice little evergreens that live right here in the foreground.
Now I'm making them a little lighter just so that they'll stand out.
Just so they'll stand out, and each one here I'll vary the tone of green a little, so they separate.
Here and there we'll add a little yellow ochre.
Stronger.
There.
Something like so.
See, maybe over in here.
[chuckles] Isn't that neat?
You can just put as many as you want in here.
Just to give that feeling.
A little of it down in here.
There.
Maybe, right there.
Something about like that, reflect a little, and we'll just sort of pull those down a little, go across.
There.
Take our knife and back to that color we used for the bank, and let's just gently, gently lay in the indication of a little, little bank here too.
We want something for those little trees to sit on back in there.
They're too pretty not to have something back here to hold them all up.
A little touch of the liquid white.
Clean up the edges a little, and here and there and there and here you can scratch in the indication of some sticks and twigs and little things that live back in there, like so.
Now then I'm going to have some real fun.
We've got a minute or so left here.
Take some Van Dyke brown, and paint thinner.
I'm going to put the paint thinner in it, to make it thin.
Make it thin.
Just Van Dyke brown.
Put some black in it too, I want it dark.
But we're making this color quite thin.
There we go.
And then I'm going to take white and black, to make a grey, sort of a light grey, and do the same thing, put paint thinner in it to make it quite thin.
Not real thin, but thinner than it normally is.
There.
Okay.
Now then.
Show you what we're going to do with that in just a second.
Maybe right out here there's a little land area.
Take that same brown color and just drop in a little bit of land here.
Something like so.
[Bob makes "tchoom" sound] There.
Okay.
Now then, I'm going to take an oval brush.
A little oval brush here, and I'm going to pull it through that dark color, both sides, and in side I'm going to take right through that light color, and up in here we're going to have maybe some great big stones that live here.
Great big stones.
And we'll just put several of them in here, but isn't that a fantastic way of making a lot of beautiful big rocks.
This is so you have a place to stand and look at this gorgeous scene.
There.
But in one stroke you can make all the little goodies there.
And maybe there's a few little grassy things that have moved in out here and they live right out here on the rocks.
But isn't that a nice little painting?
Shows you how you can do some super things.
Hope you try this one.
We're going to call that one finished.
From all of us here, happy painting, and God bless my friend.
[announcer] To order a 256 page book of 60 Joy of Painting projects or Bob's detailed 3 hour workshop DVD Call 1-800-Bob-Ross or visit BobRoss.com [music] [music]


Distributed nationally by American Public Television